(A basic tutorial that simplifies and extends the AWS documentation.)
First steps
- Create a Amazon Web Services account, if you don’t already have one
- Create a “IAM” account for the AWS account, if you don’t already have one
- This is like a “subaccount”. It’s safer to avoid using your root AWS credentials (username and password), because if any attacker has those credentials, they can do anything (they’ll use your servers to mine BitCoin haha).
- Here’s a quick way to create an IAM account:
- Go to https://console.aws.amazon.com/iam/, select
Root userat the top, enter your email, and clickNext. - In the navigation pane, choose Users and then choose
Add user. - Type a user name
- Type a password, or let a new one be generated
- Click
Next, to go toPermissions - Choose
Add user to group. - Choose
Create group. - In the
Create groupdialog box, forGroup nametype Administrators. - Select the check box for the AdministratorAccess policy.
- Choose
Create group. - Back on the page with the list of groups, select the check box for your new group. Choose Refresh if you don’t see the new group in the list.
- Choose
Next, to go toTags. - Choose
Next, to go toReview. - Choose
Create user. - Click download a .csv file with the user’s information.
- Open the AWS console via the IAM account
- (Despite the name “console”, this is a UI tool in the browser, not a text tool)
- Open the .csv file and look at the last part of the file, which looks like https://123456.signin.aws.amazon.com/console
- Open that page in a web browser
- Type in the user name and password for your IAM account.
- This website, the “AWS console” will be used frequently throughout.
Creating a chef automate server
- We’ll eventually have one chef node (a server that will run the app) and one chef automate server (which coordinates nodes). Nodes will ask the server for the “cookbooks” (set of instructions to automatically configure the server) to run.
- Creating a Chef Automate server:
- Sign into the AWS console as described above in “Prerequisites”
- Open the AWS OpsWorks console at https://console.aws.amazon.com/opsworks/.
- Choose
Go to OpsWorks for Chef Automate. - Choose
Create Chef Automate server. - Set a chef server name such as “moltenform-chef-automate-serv”
- Choose a region, and choose a “size”, the default “m5.large” is fine, and click Next.
- You can leave the default, “I’m not connecting by SSH” , under SSH key.
- Use the default “Use an automatically-generated endpoint”
- On the Configure Advanced Settings page, in the Network and Security area, choose a VPC.
- A VPC is a “virtual private cloud”.
- It’s easiest to use the “default” VPC, which should be the only option in the VPC dropdown (unless your AWS account is very old).
- You can leave the defaults for maintenence hours and backups.
- You can set Yes for Associate Public IP address
- You don’t need to set up any
Tags - Click
Nextuntil you are atReview - Click
Launch
- Important: After clicking
Launch, click both of the two blue buttons toDownload credentialsandDownload starter kit. This has to be done now, it can’t be done later! - In less than an hour, the server should have everything installed and be in “ready” status
Putting the cookbook onto the automate server
- Install the chef sdk “chefdk”, if you don’t already have it installed, from here, note that it is specific to your operating system.
- We’ll be using the knife tool (based on the tips here)
- Open a console (on Windows, a command line)
- Create and
cdinto a new directory - Run
chef generate repo chef-repo - Run
cd chef-repo - Run
mkdir .chef - Run
cd .chef - Take the “starter_kit” that you downloaded earlier, unzip it, and copy everything in its
.chefdirectory to your newly-created.chefdirectory - (The knife.rb file is important, it tells the “knife” tool how to connect to the automate server)
- (The private.pem file contains the credentials)
- Back in your chef-repo directory, let’s create a cookbook
- This simple “cookbook” installs+configures an Apache web server and shows a ‘hello world’ page.
- Run
generate cookbook cookbooks/example_install_apache - An ERB file is a template used to generate text files.
- Make a template by running
chef generate template example_install_apache index.html - (If you are on Windows, use “notepad” instead of “nano” in the following commands)
- Run
nano example_install_apache/templates/index.html.erb - Enter the following:
<html>Example: Hello world!</html>and save changes to the file. - Run
nano example_install_apache/recipes/default.rb - Enter the following
package 'Install basic packages' do
  package_name %w(wget curl bash-completion)
end

package 'Install Apache web server' do
  package_name 'httpd'
end

service 'Start and enable apache service' do
  service_name 'httpd'
  action [:enable, :start]
end

template '/var/www/html/index.html' do
  source 'index.html.erb'
  mode '0644'
  owner 'apache'
  group 'apache'
end
and save changes to the file.
- This “recipe” will
- install helpful tools like wget, curl, and bash-completion
- install and start Apache web server
- place our “hello world” template in the www directory so that apache will run it
- Optional: run
nano example_install_apache/metadata.rband enter your name - We can now upload the cookbook to the server.
- Run
knife cookbook upload example_install_apache- It will show a short message like
Uploaded 1 cookbook.
- It will show a short message like
- You can run
knife cookbook listto confirm that it was uploaded - Important: if you later decide to make changes to the recipe, do the following:
- run
nano example_install_apache/metadata.rband increase theversionnumber - for example, from
0.1.0to0.1.1 - and save changes
- then you can run
knife cookbook upload example_install_apacheto upload it.
- run
Creating a machine to be used as a node
- Let’s create a EC2 machine to be used as a node
- First, let’s create a security group that allows internet access to the node
- Sign into the AWS console as described above in “Prerequisites”
- Open the AWS EC2 console at https://console.aws.amazon.com/ec2/.
- In the top right corner, you’ll see a drop down for Support, and to the left of it, a drop down with the current “region” (such as “Oregon”, “Ohio”, “California”). If it’s not currently selected, select the same region you’ve used for the rest of these instructions. (It should be fine if you haven’t ever changed regions).
- In the list on the left, scroll down until you see
Security groups(under Network & Security), and click it - Click the orange “Create security group” button
- Enter a name like
AllowHostingSite - Enter a description like
Allow http and https - Use the default VPC, there should only be one in the list (if there is more than one, use the one you’ve used throughout this tutorial)
- Scroll down to “Inbound Rules” (note: not Outbound Rules)
- Enter the information so that it looks like this:
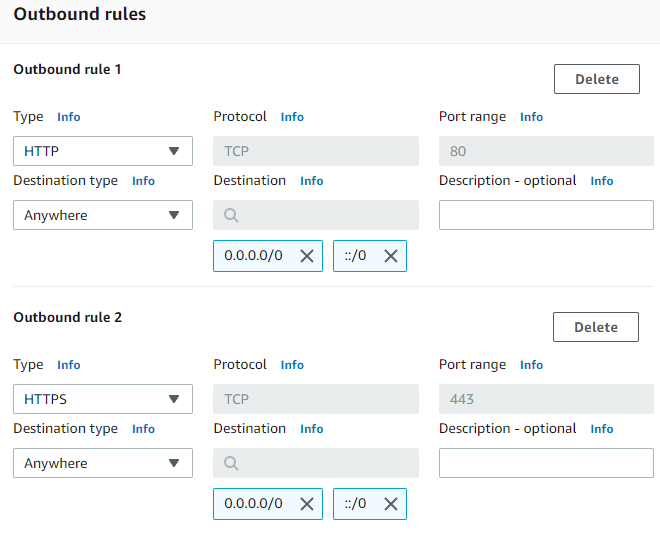 (make a rule of type HTTP, with destination type Anywhere, and a rule of type HTTPS, with destination type Anywhere)
 - Then scroll to the bottom, and click the button
Create security group - Now, let’s make the instance
- Open the AWS EC2 console at https://console.aws.amazon.com/ec2/.
- In the main middle of the page, click the orange
Launch instancebutton, and then clickLaunch instance - I recommend selecting the first choice, Amazon Linux 2 AMI (HVM), with the default 64-bit (x86)
- Click
Select - Use the default, t2.micro, and click
Review and Launch - Use the default settings, and click
Launchat the bottom of the page - A pop-up appears asking you about key pairs. Choose
Create a new key pair, enter a name likeexample-keypair, and click Download Key Pair - Once you’re sure the key file (a .pem file) has been downloaded, Click
Launch instances - After some number of minutes, the EC2 instance will be in “ready” status
Logging into the EC2 machine
- Sign into the AWS console as described above in “Prerequisites”
- Open the AWS EC2 console at https://console.aws.amazon.com/ec2/.
- In the list on the left, scroll down until you see
Instances(under Instances), and click it - You can see if the instance is still being set up, wait until it is ready.
- Right-click on the instance and a context menu will appear. Go to
Security, then clickChange Security Groups - Check the security group that you created earlier,
AllowHostingSite - Click the
Assign Security Groupsbutton - Back in the list of instances, click the instance, and look at the details shown below:
- Make note of the
instance ID, thepublic-dns-name, and theIPv4 Public IP - We’ll use them later
- Make note of the
- We can now ssh into the EC2 machine, to ensure that it looks right
- Get the path to the .pem private key that you downloaded for the EC2 instance, such as
/path/to/key.pem - Open a console (on Windows, a command line)
- In Linux,
- Run
ssh -i /path/my-key-pair.pem my-instance-user-name@my-instance-public-dns-name - This likely looks like
ssh -i /path/to/key.pem [email protected] - (More details here)
- Run
- In Windows,
- Install the newest version of PuTTY, use
puttygento “Load” the .pem file and “Save” it to a .ppk file - (In the open dialog you’ll probably need to change the file type in the lower right from “putty *.ppk” to “all files”)
- Open
PuTTYand underConnection/SSH/Auth, set thePrivate key fileto point to the ppk file. - Connect to
[email protected](the second part is the instance-public-dns-name) - (More details here)
- Install the newest version of PuTTY, use
- When connected via ssh you can run
sudo yum updateto install updates.
Creating the node
- We’re finally ready to set up a node.
- Open a console (on Windows, a command line)
cdto thechef-repodirectory created earlier- The “bootstrap” command sets up a node (it installs
chef-client, then configures and runs it). - Get the
instance ID, and theIPv4 Public IPthat you wrote down from the Instances page earlier - The
IPv4 Public IPlooks like1.2.3.200 - The
instance IDlooks likei-012345c678123456 - The path to the instance’s key looks like
/path/to/key.pem - Run the following:
knife bootstrap <IPv4 Public IP> -N <instanceid> --connection-user ec2-user -i /path/to/thekey.pem --sudo --run-list "recipe[example_install_apache]", which should look likeknife bootstrap 1.2.3.200 -N i-012345c678123456 --connection-user ec2-user -i /path/to/thekey.pem --sudo --run-list "recipe[example_install_apache]" - It’s ok to replace an existing node if asked.
- If everything worked, a lot of logs will be printed until you see a message like
Chef Infra Client finished - After some number of minutes, the node will be up and running (you can see its status in the chef dashboard page in the next section).
Looking at chef’s dashboard page
- Sign into the AWS console as described above in “Prerequisites”
- Open the AWS OpsWorks console at https://console.aws.amazon.com/opsworks/
- In the left panel, click on Chef Automate servers
- Find your chef automate server and click on its name (to the right of the green checkmark)

- There will now be a small blue link in the middle of the page that says ` Open Chef Automate dashboard`, click it.
- You’ll probably get warnings about an untrusted SSL certificate. You can bypass it (in Chrome by going to Advanced, then clicking the small gray “Continue” link at the bottom), or to install the AWS OpsWorks SSL certificate you can read here
- Unzip and open the Chef Automate credentials that you downloaded earlier. There will be a short text file, saying username ‘admin’ and a password.
- Enter the username and password.
- You can now see the Chef Automate dashboard. You can click on Infrastructure at the top of the page and see a list of nodes, or view the Event Feed.
Conclusion
- Here’s the moment of truth: is everything set up?
- Open a web browser and go to
http://<IPv4 Public IP>, which could look likehttp://1.2.3.200 - If everything is set up, you’ll see the “Example: Hello world” message you typed in earlier.
- You can now delete all of the servers and EC2 instances you created, since they might cost a bit of money over time.
- The automate server can be deleted from the “Actions” button on the AWS OpsWorks console at https://console.aws.amazon.com/opsworks/
- EC2 instances can be terminated by going to the EC2 console at https://console.aws.amazon.com/ec2/. Then click on Instances in the navigation list on the left, then right-clicking the instance in the list on the page, going to Instance State, then clicking Terminate.
References: