
|
|
SciTE 解説書 |
よくある質問 Frequently Asked Questions
SciTE での文書編集は大部分の Macintosh や Windows のエディタに似ています。これらに加えて、文書構造に基づく自動的な文字装飾を行うことができます。SciTE は複数のファイルを一度に記憶することができますが、見ることができるのはそのうちの一つだけです。初期設定では記憶可能なファイルも一つだけになっていますが、これは特性 buffers の値を編集することで変更できます。
SciTE はテキストの矩形選択が可能です。Windows では Alt キー、GTK+ では Ctrl キーを押しながらマウスをドラッグしてください。
Text editing in SciTE works similarly to most Macintosh or Windows editors with the added feature of automatic syntax styling. SciTE can hold multiple files in memory at one time but only one file will be visible. SciTE's initial configuration only allows one file to be in memory at once but this can be modified by changing the value of the buffers property. Rectangular regions of text can be selected in SciTE by holding down the Alt key on Windows or the Ctrl key on GTK+ while dragging the mouse over the text.
SciTE には二つのペイン(区画)があります。編集部と出力部です。編集部の右または下に出力部があります。出力部は最初の時点で区切り線しか見えませんが、その区切り線をドラッグすることで見えるように大きさを変えることができます。「オプション」メニューの「左右に分割」にチェックが入っていると編集部と出力部の位置関係を変えることができます。
There are two panes in SciTE, the editing pane and the output pane. The output pane is located either to the right of the editing pane or below it. Initially it is of zero size, but it can be made larger by dragging the divider between it and the editing pane. The Options | Vertical Split command can be used to move the output pane beneath the editing pane.
SciTE はコンパイルしたりソースファイルを実行したりする指示を出して、それらの出力を SciTE の出力部に表示することができます。
SciTE can perform commands to compile or run source files with the output from these commands directed into the output pane.
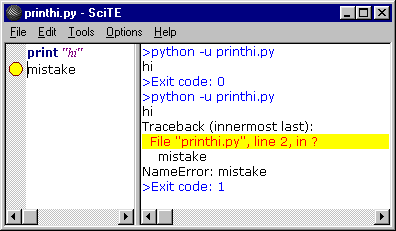
コンピュータに Python がインストールされていたとしましょう。その状態で SciTE から「ファイル」を「新規作成」し、次のように入力してみます。
For example, if Python is installed on the machine, open a new document, type:
print "Hi"
as that document's text.
この文書を printhi.py というファイル名で保存してください。
すると、その文書は色づけなどが行われます。これは SciTE がファイルの拡張子(ここでは.py)からどの文法スタイルを使えばよいかを判断したことによります。
Save the document as printhi.py.
The document should now appear coloured as SciTE is using the file's extension to decide upon
the syntax styling to use:
                print
                "hi"
次にツールメニューから「実行」してください。
先ほど説明した「出力部」が見えていなければ自動的に大きさを持ち、見えるようになります。
Perform the Tools | Go command.
The output window will be made visible if it is not already visible and will show:
                >python -u printhi.py

                hi

                >Exit code: 0
一行目の青い行は SciTE がどのようなコマンドを「実行」の際に発行したかを示しています。次の黒い行は Python プログラム(今作ったばかりの printhi.py)の出力です。最後の青い行はそのプログラムから SciTE が受け取った終了コードです。これが零であれば正常に実行されたことを意味します。
The first blue line is from SciTE showing the command it will use to run the program. The black line is the output from running the Python program. The last blue line is from SciTE showing that the program has finished and displaying its exit code. An exit code of zero indicates a successful run.
SciTE は Python, GCC, Visual C++, Borland C++, PHP やこれらと同じ形式の出力を行うツールについて、エラーメッセージの一部を理解します。試しに先ほどのファイルにわざとまちがった行を追加してみましょう。
SciTE partially understands the error messages produced by Python, GCC, Visual C++, Borland C++, PHP and other tools which use the same format as one of these. To see this, add a mistake to the Python file by adding a second line to make the file:
        print
        "hi"

        mistake
では、再び「ツール」メニューから「実行」します。結果は次のようになるでしょう。
Perform the Tools | Go command. The results should look like:
>python -u printhi.py
hi
Traceback (innermost last):
  File "printhi.py", line 2, in ?
    mistake
NameError: mistake
>Exit code: 1
今回の場合はどこに問題があるのかすぐにわかりますが、もっとソースファイルが大きい時はツールメニューの「次のメッセージ」で報告されたエラーをたどることができます。「次のメッセージ」を使うと、最初のエラーメッセージが黄色の背景色で強調されて編集部の該当行にエラーの印がつけられます。キャレットはその行に移動し必要であればスクロールも行われます。結果 SciTE は次のようになっているはずです。
While it is easy to see where the problem is in this simple case, when a file is larger the Tools | Next Message command can be used to view each of the reported errors. Upon performing Tools | Next Message, the first error message in the output pane is highlighted with a yellow background, and an error indicator is displayed for the appropriate line in the editing pane. The caret is moved to this line and the pane is scrolled if needed to show the line. SciTE now looks like this:
SciTE はエラーメッセージのファイル名部分と行番号部分をほぼ常に解釈でき、そのためにエラーの原因となった他のファイル(例えばヘッダファイル)を開くこともあります。ただしファイル名が空白や ".." を含んでいるような複雑な場合にはこの動作をしないことがあります。
SciTE understands both the file name and line number parts of error messages in most cases so can open another file (such as a header file) if errors were caused by that file. This feature may not work where the file name is complicated by containing spaces or ".."
コマンド実行に失敗してその完了までに時間がかかりすぎる場合には、ツールメニューの「実行の中断」が利用できます。
If command execution has failed and is taking too long to complete then the Tools | Stop Executing command can be used.
Windows においては、初期設定の SciTE はこのようなツールをコマンドラインプログラムとして実行します。この状態で GUI プログラムを実行するとそのウィンドウが表示されないまま実行されることになります。command.subsystem オプションにより GUI モードで実行させるよう定義することができます。subsystem オプションの省略値は 0 でこれはコマンドラインプログラム、1 であれば対象プログラムが自分でウィンドウを作るようになり、2 を指定すると ShellExecute 呼び出しを使うようになります。 ShellExecute は HTML ファイルなどを開くよい方法です。これはユーザがシェルからファイルを開く時と同じ動作をすることになっているからです。3 は内部の拡張子や director の拡張子を呼び出すことに用います(あとで訳し直した方がいいと思う。ということで未訳)。4は Windows 仕様のHTMLヘルプを読むプログラムを呼び出すときに使います。5 は Windows 仕様の WinHelp 関数を呼び出すときに使います。GTK+ では省略値である subsystem = 0 でツールを実行した後それが終了するまで待ち、またその出力を SciTE の出力部に渡します。subsystem = 2 の時はバックグラウンドでツールを実行します。
On Windows, SciTE defaults to executing tools as command line programs. Executing a GUI program in this mode results in that program being run without displaying a window. The command.subsystem option can be used to define tools that run in GUI mode. The default subsystem, 0, is for command line programs, 1 is for programs which create their own windows, and 2 is for using the ShellExecute call. ShellExecute is a good way to open HTML files and similar as it handles this similarly to a user opening the file from property the shell. 3 is for calling an internal extension or director extension, 4 is for calling the Windows specific HtmlHelp program and 5 is for calling the Windows specific WinHelp function. On GTK+, the default subsystem 0 executes the tool and waits for it to finish, redirecting output to the output pane and subsystem 2 executes the tool in the background.
SciTE に渡すことができるコマンドライン引数は、ファイル名、指示、特性です。指示と特性は "-" が先行し、 '.' やアルファベットではない最初の文字として ':' の指示を使うことで区別します。特性は特性をまとめたファイル内とおなじ文法を使い、特性ファイルの内容を上書きします。値が記されていない特性は 1 を設定されます。二重引用符は空白を含む引数を囲む場合に用いられますが、引数全体を囲まなくてはなりません。ファイル名だけを囲むといった使い方は認められないことになります。従って "-open:x y.txt" は動作しますが -open:"x y.txt" は正しく処理できません。
Linux では標準シェルで利用できる引用符の使い方が認められます。
"-p" 引数はファイルを出力して終了します。
Command line arguments to SciTE include file names, commands and properties. Commands and properties are preceded by "-" and are differentiated by the use in commands of ':' as the first character that is not '.' or alphabetic. Properties use the syntax used in property set files and override any properties set in property files. If there is no value given for a property, it is set to 1. Double quotes may be placed around arguments that contain spaces but they must be placed around the whole argument, not just around a file name, so "-open:x y.txt" works but -open:"x y.txt" doesn't. On Linux, the standard shell quoting is available. The "-p" argument causes SciTE to print the file and then exit.
例えば次のようなコマンドラインの場合。
For example,
SciTE "-font.base=font:MS Gothic,size:11" -save.recent ScintillaGTK.cxx
SciTE が起動し ScintillaGTK.cxx を開き、最近開いたファイルの一覧を読み込み、11ポイントのMS ゴシックを基本フォントとして使用します。
特性のグループは特性セットファイルとして保存できます(拡張子 ".properties" を持ちます)。コマンドラインで import 指示によりこのファイルを使用できます。
starts SciTE, opens ScintillaGTK.cxx, loads the recent file list, and uses
11 point MS Gothic as the base font.
A group of properties can be saved as a property set file (with the extension
".properties") and the import command used on the command line:
SciTE "-import c:\os\web_work" SciTEDoc.html
数種の指示が使えますが、将来はさらに多くの事ができるようになるでしょう。現在有効なものは次の通りです。
A few commands are currently available although this will expand in the future. These commands are available:
| Command | 内容 | 引数 | Argument |
|---|---|---|---|
| close: | ファイルを閉じる | ||
| cwd: | 作業ディレクトリの変更 | ディレクトリ名 | change working directory |
| find: | 文字列検索 | 検索対象文字列 | search text |
| goto: | 位置を指定して移動 | 行番号[,列番号] | line number[,column number] |
| open: | ファイルを開く | ファイル名 | file name |
| quit: | 終了 | ||
| replaceall: | すべて置換 | 検索文字列\000置換文字列 | search text\000replacement text |
| saveas: | 別名で保存 | ファイル名 | file name |
指示には次のような C 言語形式のエスケープシーケンスを使います。
Commands use C style escape sequences which include:
| Escape Sequence | 意味 | Meaning |
|---|---|---|
| \\ | 逆スラッシュ(フォントによりしばしば円記号) | backslash |
| \a | ベル文字 | bell |
| \b | 後退文字 | backspace |
| \f | 改頁文字 | form feed |
| \n | 改行文字 | new line |
| \r | 復帰文字 | carriage return |
| \t | タブ文字 | tab |
| \v | 垂直タブ文字 | vertical tab |
| \<ooo> | 一〜三桁までの八進数による指定 | octal number specified by 1, 2, or 3 digits |
| \x<hh> | 二桁の十六進数による指定 | hexadecimal number specified by 2 digits |
次のコマンドラインは /big/icon.txt を開きます。
The following opens /big/icon.txt:
SciTE -open:/big/icon.txt
Windows における次のコマンドラインは C:\Program Files\SciTE\SciTEDoc.html を開き 123 行目に移動します。
On Windows, the following opens C:\Program Files\SciTE\SciTEDoc.html and goes to the 123th line:
SciTE "-open:C:\\Program Files\\SciTE\\SciTEDoc.html" -goto:123
コマンドライン引数は左から右へと二段階に評価されます。ファイルを開くにはユーザインタフェースが必要ですし、インタフェースが表示されるにはそれに関する特性をさらに定めなくてはならないからです。最初の段階では一番目のファイル名を開く指示がある直前までを処理します。次の段階で残りの引数が処理されます。
Command line arguments are evaluated left to right in two phases because opening files requires the user interface to be available and there is also a need to set some user interface properties before the user interface is displayed. The first phase process arguments until just before the first file name would be opened. The second phase processes the remaining arguments.
このため例えば find: や goto: の指示をファイルに対して実行するには、ファイル名のほうを先に置く必要があります。そうすれば指示の実行の前にファイルを読み込むことができます。
So, if you need to perform e.g. a find: or a goto: command on a file, you must put the command after the filename, to allow SciTE to open the file before performing the command.
Windows における注意:
簡単な形式のファイル名がディレクトリ名に一致した場合、ファイルを開くダイアログが出てきます。この動作は "open.dialog.in.file.directory" 特性の設定に影響をうけます。
もし "buffers" 特性が一より大きく、ファイル名が単一の実在ファイルかワイルドカード使用の結果一つ以上のファイルに合致すると、 "buffers" 特性で指定された数を上限として複数ファイルが読み込まれます。この場合、ディレクトリは数に含まれません。
ファイル名が単一の拡張子である場合、その名前のファイルがない限りファイルを開くダイアログが現れ、指定された拡張子はファイルフィルタとして用いられます。この拡張子指定部の前にパス名を先行させることもできます。
ファイル名が拡張子を含まない場合、拡張子の省略値として "source.default.extensions" 特性が用いられます。
For Windows:
If any simple file name on the command line matches a directory name, the file open dialog appears - this is dependant upon the property
"open.dialog.in.file.directory"
If the property "buffers" is greater than one and the file name matches either a existing file or by means of a wildcard search, one or more files, the
matching files are loaded up to the property "buffers" count. Directories are not considered a match in this case
If the file name is an extension, optionally preceded by a path, and no such simple file name exists, the file open dialog appears, with the given extension as
the filter.
If the file name contains no extension, the property "source.default.extensions" is used to provide default extensions to attempt to match the file name to an
existing file.
それぞれがファイルの内容を保持しているバッファの最大数を設定できます。一から百までが有効です。省略値は 1 で、これはバッファの特長を利用しないことになります。複数のバッファがあるときはそれらを切り替えるためにバッファメニューが使えるようになります。ファイル名を選択するほか F6 キーで前、Shift+F6 キーで次のバッファに切り替えることができます。十以上のバッファがあると、いくつかのメニューの長さが変わってしまい、ここに含まれなかったファイルには(訳注:一回で)アクセスできなくなる問題が起こります。
SciTE may be configured to use between 1 and 100 buffers each containing a file. The default is 1 and this effectively turns off buffers. With more than one buffer, the Buffers menu can be used to switch between buffers, either by selecting the file name or using the Previous (F6) and Next (Shift+F6) commands. Setting more than 10 buffers may cause problems as some menus are fixed in length and thus files beyond that length may not be accessible.
全てのバッファがファイル内容を保持しているときに新しいファイルを開くと、保存しなくてはならないバッファの再利用する必要性がでてきます。この場合、ユーザがファイルを保存するように促す通知が表示されます。
When all the buffers contain files, then opening a new file causes a buffer to be reused which may require a file to be saved. In this case an alert is displayed to ensure the user wants the file saved.
セッションとはファイル名の一覧です。SciTE で開いているバッファの完全なセットをセッションとして保存できます。これにより後から高速な一括読みだしができるようになります。
A session is a list of file names. You can save a complete set of your currently opened buffers as a session for fast batch-loading in the future. Sessions are stored as plain text files with the extension ".ses".
ファイルメニューの「セッションを読み出す」「セッションを保存」で上記セッションの読み出しあるいは保存を行います。"save.session" 特性変数により直前のセッションを自動的に読み込む機能の有効化あるいは無効化を指定できます。
Use File | Load Session and File | Save Session to load/save sessions. You can turn on/off "last session autoloading" using SciTE properties variable "save.session".
もし "buffers" 変数が 0 になっていたら、セッションの管理は行われなくなります。
If "buffers" variable is set to "0" session management is turned off.
直前に保存したセッションの読み出しの際、現在開いているバッファは閉じられます。しかしながら、未保存バッファ内容を保存するかどうか尋ねられるのでそれまでの編集結果が(突然)失われることはありません。
Loading previously saved session will close your currently opened buffers. However you will not loose your edits, because you will be asked to save unsaved buffers first.
特定のファイルをコマンドラインで指定して開くことは "save.session" 変数を上書きすることになります。コマンドラインで特定のファイルを読み出す指示を与えると、"save.session" の値が "1" でも直前のセッションは復帰しません。これにより "save.session" は安全に利用できます。つまり、ファイルを一つだけ開きたいときに複数のファイルを開いてしまうようなことは起こらないわけです。
Opening a specific file from command line overrides "save.session" variable state. When you start SciTE loading a specific file from command line last session will not restore even if "save.session" variable is set to "1". This makes "save.session" safe to use - you will never open a couple of files when you are trying to open just one, specific file.
SciTE は現在次の文書の文法スタイルに対応しています。
SciTE currently is able to syntax style these languages:
これらの文書に対するビルド及び実行の指示はすでに用意されていますが、誰が使っても動作するように修正を受け、検査される必要があるでしょう。
Running and building commands for some of these languages have been set up but should be checked as they will have to be modified to work for many people.
文書の種類はファイルの拡張子から決定されますが、文書の種類メニューから別の種類を指定することができます。文書の種類メニューは menu.language 特性により変更できます。
Language settings are determined from the file extension but this can be changed by selecting another language from the Language menu. The language menu can be changed with the menu.language property.
SciTE はオプションで検索語・正規表現・合致条件・逆方向検索とファイル末端に達したらもう一方の端から検索を続けるという指定ができます。C 言語形式の逆スラッシュエスケープシーケンスを制御文字の検索や置換に利用できます。書式の詳細はコマンドライン引数の解説で紹介した物と同じです。
SciTE has options to allow searching for words, regular expressions, matching case, in the reverse direction, wrapping around the end of the document. C style backslash escapes which are listed in the command line arguments section, may be used to search and replace control characters. Replacements can be made individually, over the current selection or over the whole file. When regular expressions are used tagged subexpressions can be used in the replacement text.
SciTE はタグによる基本的な正規表現を利用できます。
SciTE supports basic regular expressions with tagging.
SciTE は Scintilla で定義されているキー操作をそのまま使っています。これは一般的な Windows や GTK+ の習慣をほぼ踏襲していることを意味します。移動キー(矢印キー, Page Up/Down, Home, End)はいずれも Shift キーを押しながら操作するとコンピュータのデータとして一続きになっている選択範囲の拡縮ができます。Shift に加えて Alt キーも押したままであれば視覚的に矩形範囲の選択ができます。Scitnilla 定義のいくつかのキーは使えないことがあります。英語ではないキーボードによる別目的の利用や GTK+ のウィンドウマネージャのようなシステムが先に処理してしまうことが原因です。user.shortcuts の設定でキーを機能に割り当てることができます。vc.home.key によって Home キーの挙動が変わることに注意してください。メニューと同じ効果を持つキー操作はメニュー自体に書かれています。メニューになく、やや一般性の低い操作は次の通りです。
SciTE uses the default key bindings defined in Scintilla, so keyboard commands in SciTE mostly follow common Windows and GTK+ conventions. All move keys (arrows, page up/down, home and end) allows to extend or reduce the stream selection when holding the Shift key, and the rectangular selection when holding the Shift and Alt keys. Some keys may not be available with some national keyboards or because they are taken by the system such as by a window manager on GTK+. The user.shortcuts setting may be used to assign a key to a function. Note that Home key behaviour is changed by the vc.home.key option. Keyboard equivalents of menu commands are listed in the menus. Some less common commands with no menu equivalent are:
| 文字を大きくする | Ctrl+テンキーの+ |
| 文字を小さくする | Ctrl+テンキーの- |
| 文字の大きさを元に戻す | Ctrl+テンキーの/ |
| 最近読み出したファイルを巡回 | Ctrl+Tab |
| インデント(字下げ)。選択範囲があれば構造的に。 | Tab |
| デデント(インデントの逆) | Shift+Tab |
| 単語の先頭まで削除 (訳注:多分日本語の文では役に立たない) | Ctrl+BackSpace |
| 単語の最後まで削除 (訳注:同上、こちらは後ろの空白まで削除する) | Ctrl+Delete |
| 行頭までを削除 | Ctrl+Shift+BackSpace |
| 行末までを削除 | Ctrl+Shift+Delete |
| 文書の頭に移動 | Ctrl+Home |
| 文書の頭に移動、選択範囲も文書先頭まで拡張 | Ctrl+Shift+Home |
| 文書構造を無視して行頭に移動 (訳注: Home キーだけの時はまず行頭インデントの直後に移動する) | Alt+Home |
| 構造を無視して行頭に移動、選択範囲も拡張 | Alt+Shift+Home |
| 文書の末尾に移動 | Ctrl+End |
| 文書の末尾に移動、選択範囲も拡張 | Ctrl+Shift+End |
| 構造を無視して行末に移動 (訳注: もしかして意訳間違ってるかも) | Alt+End |
| 構造を無視して行末に移動、選択範囲も拡張 | Alt+Shift+End |
| 折りたたみの実行/解除。文書構造による。 | Ctrl+テンキーの* |
| ブックマークの設定と解除 | Ctrl+F2 |
| 次のブックマークへ移動 | F2 |
| 次のブックマークまで選択 | Alt+F2 |
| 検索。選択範囲があればその文字列を。 | Ctrl+F3 |
| 逆方向(上)に検索。 | Ctrl+Shift+F3 |
| スクロールアップ | Ctrl+↑ |
| スクロールダウン | Ctrl+↓ |
| 一行切り取り | Ctrl+L |
| 一行複製 | Ctrl+Shift+T |
| 一行削除 | Ctrl+Shift+L |
| 現在行を前行と交換 | Ctrl+T |
| 一行複製 | Ctrl+D |
| 入れ子をとばして一致する条件分岐プリプロセッサを順方向検索 | Ctrl+K |
| 一致する条件分岐プリプロセッサまでを選択(順方向検索) | Ctrl+Shift+K |
| 入れ子をとばして一致する条件分岐プリプロセッサを逆方向検索 | Ctrl+J |
| 一致する条件分岐プリプロセッサからを選択(逆方向検索) | Ctrl+Shift+J |
| 前段落へ移動。Shift キーも押していれば選択範囲を拡張する(以下同様)。 | Ctrl+[ |
| 次段落へ移動。 | Ctrl+] |
| 前の単語へ移動。(訳注:以下、おそらく日本語では役に立たない) | Ctrl+← |
| 次の単語へ移動。 | Ctrl+→ |
| 前の単語の部分へ移動。 | Ctrl+/ |
| 次の単語の部分へ移動。 | Ctrl+\ |
| Magnify text size. | Ctrl+Keypad+ |
| Reduce text size. | Ctrl+Keypad- |
| Restore text size to normal. | Ctrl+Keypad/ |
| Cycle through recent files. | Ctrl+Tab |
| Indent block. | Tab |
| Dedent block. | Shift+Tab |
| Delete to start of word. | Ctrl+BackSpace |
| Delete to end of word. | Ctrl+Delete |
| Delete to start of line. | Ctrl+Shift+BackSpace |
| Delete to end of line. | Ctrl+Shift+Delete |
| Go to start of document. | Ctrl+Home |
| Extend selection to start of document. | Ctrl+Shift+Home |
| Go to start of display line. | Alt+Home |
| Extend selection to start of display line. | Alt+Shift+Home |
| Go to end of document. | Ctrl+End |
| Extend selection to end of document. | Ctrl+Shift+End |
| Go to end of display line. | Alt+End |
| Extend selection to end of display line. | Alt+Shift+End |
| Expand or contract a fold point. | Ctrl+Keypad* |
| Create or delete a bookmark. | Ctrl+F2 |
| Go to next bookmark. | F2 |
| Select to next bookmark. | Alt+F2 |
| Find selection. | Ctrl+F3 |
| Find selection backwards. | Ctrl+Shift+F3 |
| Scroll up. | Ctrl+Up |
| Scroll down. | Ctrl+Down |
| Line cut. | Ctrl+L |
| Line copy. | Ctrl+Shift+T |
| Line delete. | Ctrl+Shift+L |
| Line transpose with previous. | Ctrl+T |
| Line duplicate. | Ctrl+D |
| Find matching preprocessor conditional, skipping nested ones. | Ctrl+K |
| Select to matching preprocessor conditional. | Ctrl+Shift+K |
| Find matching preprocessor conditional backwards, skipping nested ones. | Ctrl+J |
| Select to matching preprocessor conditional backwards. | Ctrl+Shift+J |
| Previous paragraph. Shift extends selection. | Ctrl+[ |
| Next paragraph. Shift extends selection. | Ctrl+] |
| Previous word. Shift extends selection. | Ctrl+Left |
| Next word. Shift extends selection. | Ctrl+Right |
| Previous word part. Shift extends selection | Ctrl+/ |
| Next word part. Shift extends selection. | Ctrl+\ |
省略表現を入力して編集メニューの「省略表現を展開」を実行するか Ctrl + B を入力すると、展開後の単語に置き換えられます。この対応は省略表現ファイルで定義されます。省略表現ファイルはオプションメニューから開くことができ、任意に追加することができます。
To use an abbreviation, type it and use the Expand Abbreviation command or the Ctrl+B key. The abbreviation is replaced by an expansion defined in the Abbreviations file. You can open the Abbreviations file with a command in the Options menu and add abbreviations.
省略表現ファイルの各行は "省略形=完全形" という書式になっています。省略形の名前は(厳密な意味での CR と LF のコードを除いて)どのような文字でも構いません。ASCII の上位区画の文字(アクセント付のアルファベット)も使えます。
(訳注: 日本語の場合は ASCII 上位区画の話は意味を持たない。)
特性ファイルに既述する名前には制限があります。シャープ記号(#)や空白、タブ文字を最初の文字にはできません。空白を途中に挟むことはできます。また '=' を中に挟むことはできません。省略形の名前は32文字を上限とします。「省略」形には充分な大きさでしょう。
Each line in the files looks like "abbreviation=expansion".
The abbreviations names can have any character (except perhaps control chars,
surely for CR and LF), including high Ascii chars (accented chars).
Names have properties files limits: they cannot start with sharp (#) or space or tab
(but can have spaces inside); and they cannot have '=' character inside.
Abbreviations names are limited to 32 characters. It is probably enough for
abbreviations...
また、ここでは二つの拡張された記法が用いられます。改行を意味する '\n' と、キャレットの位置を意味する '|' です。文字としての '|' を示す場合は '||' と記述してください。簡単な例のいくつかが SciTE に含めて配布されています。
省略形の展開の際に、元の省略形が前の単語から離れている必要はありません。例えば é を 'é' と定義しておくと単語の中で展開することができます。省略形が他の省略形の末尾と同じである場合、短い方だけが展開されます。'ring' と 'gathering' が定義されていると、後者の一部が 'ring' として展開されてしまいます。
An expansion may contain new line characters indicated by '\n' and
a caret position indicated by the '|' character. To include a literal '|'
character, use '||'.
Some simple examples are included in the distributed Abbreviations file.
When expanding, the names don't need to be separated from the previous text.
Ie. if you define é as 'é', you can expand it inside a word.
If a name is the ending of another one, only the shorter will ever be expanded.
Ie. if you define 'ring' and 'gathering', the later will see only the 'ring' part expanded.
SciTE では Python, HTML/XML, Pascal, C++/C/Java/JavaScript の文法構造による折りたたみを利用できます。Python ではインデントにより、また他の文書では括弧を数えることにより折りたたみ可能な位置が決められます。
折りたたみの目印はクリックすることによってたたんだり再表示したりすることができます。目印表示用の余白を Ctrl+Shift+クリックすると、全ての最上位の折りたたみを切り替えます。目印に対して Ctrl+クリックするとその子要素もクリックした要素に合わせて折りたたみもしくは再表示します。目印に対して Shift+クリックするとその子要素をすべて表示します。
SciTE supports folding for Python, HTML/XML, Pascal, and C++/C/Java/JavaScript. Fold points are based upon indentation for Python and on counting braces for the other languages. The fold point markers can be clicked to expand and contract folds. Ctrl+Shift+Click in the fold margin will expand or contract all the top level folds. Ctrl+Click on a fold point to toggle it and perform the same operation on all children. Shift+Click on a fold point to show all children.
特性ファイルの編集によって SciTE の動作の多くを変更することができます。
Much of SciTE's behaviour can be changed by editing the properties files.
三つの特性ファイルがあります。
これらのファイルに記された設定は、局所用 > ユーザ特性 > 共有特性設定という優先順位があります。環境変数も特性として利用できます。環境変数による特性は、特性ファイルのいずれかに「明示的な」設定記述があると無視されます。
There are three properties files used:
Settings in the local properties file override those in the user properties file which override those in the global properties files. Environment variables are also available as properties and these are overridden by an explicit setting in one of the properties files.
共有特性設定ファイルは SciTE の各オプションの省略値を持っています。ユーザ特性ファイルは、共有特性設定ファイルをそのままにしながら設定を変更可能とします。局所用の特性ファイルは、主にコンパイル・ビルド・実行指示の内容をディレクトリ毎に変えることを意図しています。例えば私は Java Development Kit の javac コンパイラを多くの仕事に使っていますので SciTEGlobal.properties では .java ファイルのコンパイルには "javac" を使うように指定します。時に私が jvc コンパイラを使いたくなったときは、コンパイル対象があるディレクトリに SciTE.properties を作って "jvc" を使うように指定するのです。
The user properties file is intended for customisation by the user, leaving the global properties file to contain the default options distributed with SciTE. The main use of the local properties files is to change the effects of the Compile, Build and Go commands for the files in a directory. For example, I use the javac compiler from the Java Development Kit for most work, so SciTEGlobal.properties sets the command for compiling .java files to "javac". If I want to use the jvc compiler for the files in one directory, then the SciTE.properties file in that directory contains an entry setting the command to "jvc".
Windows では共有特性設定ファイルは実行ファイルと同じディレクトリにあります。ユーザ特性ファイルは環境変数 USERPROFILE が示すディレクトリか、USERPROFILE が未設定であれば実行ファイルと同じディレクトリに格納されます。
GTK+ ではユーザ特性ファイルはユーザのホームディレクトリにあり、共有特性設定ファイルを格納するディレクトリは SciTE のビルドの際に指定されています。通常は /usr/share/scite です。ただし Windows, GTK+ を問わず環境変数 "SciTE_HOME" がある場合はそれがこの二つの特性ファイルの格納先となります。
On Windows, the global properties file is located in the directory of the executable. The user properties file is looked for in the user profile directory as set in the USERPROFILE environment variable, or in the directory of the executable if USERPROFILE is not set. For GTK+ the user properties file is found in the user's home directory and the global properties in a directory set at build time - normally /usr/share/scite. If the "SciTE_HOME" environment variable is set on either Windows or GTK+ then it is where both the global and user properties files are found.
オプションメニューにはこれらの特性ファイルを開く項目があります。
There are commands in the Options menu for opening each of the properties files.
'#' で始まる行や完全に空白の行は意味のない行とされます。他の行は次のような形になっています。
The files are in approximately the same format as Java properties files which have a simple text format. Lines that start with '#' or that are completely blank are comments. Other lines are of the form
変数名=値
variable=value
長い値については、行末に '\' を置くことで次の行に続きを書くことができます。空白文字も意味を持つため x =1 は変数 "x " の値を定義することになります。他の変数の値は $(変数名) の形で利用できます。現在編集中のファイルの名前などは次のような定義済み変数で参照できます。
For long values, a '\' character at the end of the line continues that value on the next
line. Space characters are significant so x =1 defines a variable called
"x ".
Values may include the values of other variables by using $(variablename). There are
some variables set by the environment to access the name of the current file as well:
| 変数名 | 内容 |
|---|---|
| FilePath | 編集中のファイルのフルパス |
| FileDir | 編集中のファイルがあるディレクトリ。末尾に区切り文字は入らない。 |
| FileName | 編集中のファイルの拡張子を含まない名前 |
| FileExt | 編集中のファイルの拡張子 |
| FileNameExt | $(FileName).$(FileExt) と等価。 |
| SessionPath | 現在のセッションのフルパス |
| CurrentSelection | 現在選択状態になっている文字列 |
| CurrentWord | キャレットがある、または近くにある単語。 (訳注:おそらく日本語では役に立たない) |
| Replacements | 直前の置換操作で置換を行った数 |
| SelectionStartColumn | 選択範囲先頭の桁位置 |
| SelectionStartLine | 選択範囲先頭の行位置 |
| SelectionEndColumn | 選択範囲末尾の桁位置 |
| SelectionEndLine | 選択範囲末尾の行位置 |
| CurrentMessage | 最後に選択された出力部のメッセージ |
| SciteDefaultHome | 共有特性設定ファイルが見つかったディレクトリ |
| SciteUserHome | ユーザ特性ファイルが見つかったディレクトリ |
| Name | Meaning |
|---|---|
| FilePath | full path of the current file |
| FileDir | directory of the current file without a trailing slash |
| FileName | base name of the current file |
| FileExt | extension of the current file |
| FileNameExt | $(FileName).$(FileExt) |
| SessionPath | full path of the current session |
| CurrentSelection | value of the currently selected text |
| CurrentWord | value of word which the caret is within or near |
| Replacements | number of replacements made by last Replace command |
| SelectionStartColumn | column where selection starts |
| SelectionStartLine | line where selection starts |
| SelectionEndColumn | column where selection ends |
| SelectionEndLine | line where selection ends |
| CurrentMessage | most recently selected output pane message |
| SciteDefaultHome | directory in which the Global Options file is found |
| SciteUserHome | directory in which the User Options file is found |
どの変数が使われるべきかを決めるため、いくつかの手法を取ります。例えば変数 lexer は特定のファイル名で確定するかワイルドカードによって特定のグループに確定するかします。ですから:
lexer.makefile=makefile は "makefile" という解析器が "makefile" という名のファイルに使われるべきであることを示します。
lexer.*.cxx=cpp は "cpp" という解析器が "cxx" という拡張子を持つファイルに対して使われるべきであることを示します。
変数による代入は次のように左辺のファイルパターン充当にも使うことができます。
file.patterns.html=*.html;*.htm;*.asp;*.shtml
command.go.$(file.patterns.html)=file://$(FilePath)
Some features use file name patterns to see which variable to use. For example, the lexer
variable can be specialised for a particular file, or a group of files based upon wildcard
matching so:
lexer.makefile=makefile indicates that the lexer called "makefile" should be used on
files called "makefile".
lexer.*.cxx=cpp indicates that the lexer called "cpp" should be used on files with a
"cxx" extension.
Variable substitution is available on the left hand side of file pattern assignments and
look like this:
file.patterns.html=*.html;*.htm;*.asp;*.shtml
command.go.$(file.patterns.html)=file://$(FilePath)
'import' という記述は、その位置に相手ファイルの内容があるかのように別のファイルの内容を挿入します。挿入される特性ファイルは import を記述しているファイルと同じディレクトリになくてはなりません。また properties という拡張子が仮定されます。"import Lua" という記述が c:\os\scite\bin\SciTEGlobal.properties というファイルにあれば c:\os\scite\bin\Lua.properties の内容が挿入されます。
The 'import' statement includes a properties file as if the text were inline at that point. The imported properties file must be in the same directory as the current file and a properties extension is assumed. Therefore a "import Lua" statement in c:\os\scite\bin\SciTEGlobal.properties will import c:\os\scite\bin\Lua.properties.
'if' は引数を一つとります。引数はその特性ファイルか基礎となる特性ファイルで定義済みの変数です。もし 0 と評価されたら「偽」とみなされます。空文字列やその時点で未定義の変数の場合も 0 と評価されます。最上位の特性と値の組として 'PLAT_GTK' か 'PLAT_WIN' が '1' に定義されています。評価の結果「真」とみなされれば後続の字下げされた記述が実行されます。字下げのない行まで来たら if 節は終了します。if 節の中では単純な記述のみが許されています。if の評価は読み込まれた時に行われます。実際に使われる時ではありません。
The 'if' statement takes one argument which is a symbol that may be defined earlier in this property set file or in a base property set. If the symbol evaluates to '0' then the test fails. An empty string or not present symbol evaluates to 0. Into the very top property set is inserted one of 'PLAT_GTK' with value '1' or 'PLAT_WIN' with value '1'. If the test succeeds then following indented statements are executed. When a non-indented statement is found the if clause is finished. Only simple set statements are allowed in if clauses. The evaluation of if statements occurs at read time, not at evaluation time.
$(1) 〜 $(4) を実行時可変引数として使うことができます。表示メニューから「引数」を実行すると現在の四引数がダイアログに表示され、また変更することができます。このとき、元のウィンドウのキーボードショートカットも有効なままですので手早く引数を変えながら繰り返し実行を行うことができます。これに対して引数ダイアログが表示されているときに元のウィンドウに対する操作を無効にすることも可能です。'*' をコマンドの直前、先頭に与えてください。すでに前者のダイアログが出ている場合は '*' は無視されます。
SciTE has 4 properties $(1) .. $(4) which can be used to run commands with changeable parameters. To set the parameter values, use the View | Parameters command to view the modeless Parameters dialog which shows the current values of these parameters and allows setting new values. The accelerator keys for the main window remain active while this dialog is displayed, so it can be used to rapidly run a command several times with different parameters. Alternatively, a command can be made to display the modal Parameters dialog when executed by starting the command with a '*' which is otherwise ignored. If the modeless Parameters dialog is already visible, then the '*' is ignored.
いくつかの特性は Windows か GTK+ でのみ有効です。
Some properties are only available on Windows or GTK+.
|
position.left position.top position.width position.height |
ウィンドウの最初の位置と大きさを指定します。もし与えられていなければ各環境の標準値が使用されます。width または height が -1 のときはウィンドウは最大の状態で起動します。 |
| position.tile | 他の SciTE がすでに起動済みだった場合、後のウィンドウの初期位置を先のウィンドウの左端から position.left + position.width の位置にします。多くの場合双方が重なることなく表示されることになります。position.left を 0 に、position.width を画面幅の半分にするとうまく動作します。 |
| buffers | 1 から 100 までの値を設定し、バッファをいくつ持てるかを定めます。範囲外の値は範囲内に丸められます。省略値は 1 で、このときバッファに関するメニューなどは出てこなくなります。 この値は起動時の早い時点で一度だけ読み込まれ、共有特性設定ファイルでのみ有効です。このため変更後 SciTE を再起動するまで効果は現れません。 |
|
are.you.sure are.you.sure.for.build |
GUI による昔ながらの質問についてです。通常は SciTE が編集後未保存のファイルを閉じる前にうるさく尋ねてきます。これを抑えるには are.you.sure に 0 を設定します。するとユーザを煩わせることなく自動的に保存するようになります。この状態で編集した物を捨てるときは「新規作成」を実行してください。「新規作成」は常に質問をしてきますのでファイルを保存しないための機会を得ることができます。 ファイルをビルドまたは実行する際には多くの場合まず前もって保存してほしいものです。その前に確認ダイアログを出したい場合は are.you.sure.for.build=1 と記述してください。 |
|
view.whitespace view.indentation.whitespace |
view.whitespace を 1 にすると起動時にはホワイトスペースが確認できるようになっています。このとき Setting view.indentation.whitespace を 0 にすると字下げ中のホワイトスペースを不可視にします。 |
|
whitespace.fore whitespace.back |
ホワイトスペースが見えるようにしているとき、ホワイトスペースに関して構文解析器の色設定を上書きします。 |
| view.indentation.guides highlight.indentation.guides | view.indentation.guides を 1 にすると縦の点線が indent.size 列毎のホワイトスペース上に表示されます。 highlight.indentation.guides を 1 にすると括弧が強調されているときにその括弧に対応する字下げも強調されるようになります。 |
| view.eol | 1 にすると行末を構成する文字が表示されます。(CR), (LF), (CR)(LF) といった表示になります。行末表現を選ぶソフトを持つ他の OS で作ったファイルを使うときに便利です。 |
| eol.mode | 通常、行末文字は SciTE を実行している環境によって決まります。次の値を eol.mode に設定することでこの挙動を上書きすることができます。
LF UNIX 形式 CR Macintosh 形式 CRLF DOS/Windows 形式 |
| eol.auto | この設定は eol.mode を上書きし、開いたファイルの現在の内容に基づいて行末文字を選択します。そのファイルの中で最もたくさん使われている形の行末文字が使用されます。 |
|
blank.margin.left blank.margin.right |
テキストの横の余白を設定します。テキストの標準背景色で描かれます。省略値は左右とも 1 ピクセルです。 |
| margin.width | テキストの左に選択範囲を示すための余白を設定します。必要な余白をピクセル単位で記述してください。余白には選択範囲分の線による目印がつきます。 |
|
fold.margin.colour fold.margin.highlight.colour |
折りたたみを示すための余白について色と強調色を設定します。定義しなかった(注釈状態のままにしておいた)場合は適当な色が選択されます。Windows では、システム色の一つであるスクロールバーの背景色が使用されます。例として fold.margin.colour=#FF0000 と
fold.margin.highlight.colour=#0000FF が設定された場合、この余白の通常色が赤、強調色が青になります。 |
| full.screen.hides.menu | 表示メニューの全画面が有効になっているときにメニューを隠します。Windows でのみ有効で、GTK+ では常にメニューは表示されています。 |
| minimize.to.tray | 1 を設定すると SciTE が最小化されたときにタスクバーではなくシステムトレイに格納されます。 |
|
line.margin.visible line.margin.width |
SciTE は選択部表示余白の左に行番号を表示することができます。line.margin.visible を 1 に設定すると起動時から表示されるようになります。line.margin.width 特性には行番号用にどのくらいの領域を使うかを桁数で設定します。桁数の後ろに '+' を記述しておくと必要に応じて表示桁数が増えていくようになります。line.margin.width=3+ といった形になります。これらの特性は古い line.numbers を置き換えるものです。line.numbers はすでに無効になっています。 |
|
tabbar.visible tabbar.hide.one |
tabbar.visible を 1 に設定するとバッファについてタブが表示されるようになります。 buffers が 1 より大きな値でないと意味を持ちません。tabbar.hide.one を 1 に設定すると、タブが一つしかないときは表示されなくなります。Windows と GTK+ 2.x で動作しますが、GTK+ 1.x では無効です。 |
| tabbar.multiline | tabbar.multiline を設定するとタブが必要に応じて複数行に渡って表示されるようになります。 |
| toolbar.visible | 1 に設定するとツールバーが起動時から見えるようになります。 |
| undo.redo.lazy | 1 に設定すると、ツールバー上のボタンを各々有効にするかどうかの判断方法を変更します。判断の正確さが落ちますが遅い機械で動作を速めることがあります。 |
| statusbar.visible | 1 に設定するとステータスバーが起動時から見えるようになります。 |
|
statusbar.number statusbar.text.番号 |
すべての環境で statusbar.text.1 には省略値としてステータスバーに表示される情報を定義しています。このテキストには $() の書式でその特性の値を表すことができます。共通して利用できるものは ReadOnly, EOLMode, BufferLength,
NbOfLines (現在のバッファが持つテキストの総行数), SelLength (選択範囲の文字数), SelHeight (選択範囲の行数) です。ステータスバー専用の特性には LineNumber(行番号), ColumnNumber(列番号), OverType(上書きモード)があります。OverType は "OVR" または "INS" を表示します。次のファイルに関する特性なども利用することができます。FileName, FileNameExt, FileDate, FileTime, FileAttr, CurrentDate, CurrentTime.これらは前記のものと異なりキー入力毎に変化するわけではありません。 Windows に限り statusbar.text.2 以降を指定することができます。2 以降の内容はステータスバーをクリックするたびに入れ替わります。statusbar.number でいくつのテキストが入れ換えられるかを設定します。 |
| use.palette | 1 に設定すると 8 ビットのディスプレイでパレットを使い、より多くの色を表示させることができます。この設定がない場合は Windows のシステムパレットのみを使います(通常20色)。設定することでちらつきが起こりやすくなることが欠点です。GTK+ ではすでにパレットを使っているためこの設定は意味を持ちません。 |
| buffered.draw | 省略値は 1 です。これに代わって 0 を設定するとビットマップバッファを介さず直接画面に出力します。ビットマップバッファを使えばちらつきは起こりませんが動作は遅くなります。 |
| two.phase.draw | 二段階描画はテキストを描く方法として時間がかかります。単段階描画では、同じ書式の文字は背景とまとめて一回で描画されます。。もし文字が行末で "V_" といった形のオーバーハング、つまり "V" が後続の "_" と異なる書体で V の一部が _ の上に重なっているような場合 V の右側は _ の背景色で塗りつぶされてしまうことがあります。二段階描画では全ての背景をまず塗り、その上から文字の部分だけを上書きします。描画バッファを使用しない設定の時は、この二段階描画により画面のちらつきが起こりやすくなります。省略値では二段階描画になっています。 |
|
load.on.activate save.on.deactivate |
load.on.activate 特性は編集中のファイルが他のプロセスから更新されていないかを SciTE がアクティブになるたびに調べるかどうかを設定します。WYSIWYG な HTML エディタなどの他のエディタと平行利用するときに有用です。 save.on.deactivate 特性は SciTE がフォーカスを失ったときにそのファイルを常に保存するようにします。こちらは Web ページを開発しているときに何度もブラウザでの見え方を検査したい場合に便利です。 |
| are.you.sure.on.reload | load.on.activate とこの特性がともに 1 に設定されているとき、変更されていたファイルを読み直すかどうかを尋ねてきます。SciTE で編集している状態を保持することを選択できることになります。省略された場合、この機能は無効となっていますので質問に煩わされることなく再読込を行わせることができます。 |
| reload.preserves.undo | 1 に設定するとファイルの再読込の際にも取り消しの履歴の全てを消さなくなります。load.on.activate が有効でフィルタコマンドと平行利用しているときに便利です。 |
| check.if.already.open | 設定されていると SciTE が起動したときにすでに SciTE が起動済みかどうかを検査します。もし起動済みであればそちらのほうがアクティブになり、後から起動した SciTE は終了します。自動的に SciTE は選択され、コマンドライン引数を開くかどうかを尋ねてきます。 |
| read.only | 設定されていると開いた文書は初期状態で読み出し専用になっています。新規作成ファイルについてはこの限りではありません。 |
| quit.on.close.last | 設定されているとファイルメニューの「閉じる」などで SciTE の最後のバッファが閉じられるとき SciTE 自身も終了します。省略されているときは 最後のバッファを閉じても SciTE は残り、空の文書を新規作成します。 |
|
selection.fore selection.back |
選択範囲文字列に対して使われる色を設定します。未設定だった場合、設定の無かったほうは選択範囲に対する色変化が起こらなくなります。省略されていた場合、背景色が明るい灰色になり、文字色は非選択文字列から変化なしとなります。 |
| caret.fore | キャレットの色を設定します。 |
| caret.line.back | キャレットがある行の背景色を設定します。 |
| caret.period | キャレットの点滅間隔を設定します。ミリ秒単位で点滅の表示時間を指定します。非表示時間は表示時間と同じです。0 が設定されると点滅しなくなります。 |
| caret.width | キャレットの幅をピクセル単位で設定します。1,2,3 のいずれかのみが動作します。 |
|
caret.policy.xslop caret.policy.width caret.policy.xstrict caret.policy.xeven caret.policy.xjumps caret.policy.yslop caret.policy.lines caret.policy.ystrict caret.policy.yeven caret.policy.yjumps |
slop を設定すると「位置溢れ」とみなす値を定義できます。幅には xslop を、行には yslop を用います。 strict を設定すると、厳しめに挙動を適用します。slop が設定されていなければ可視部の中央にキャレットが位置します。そうでなければ slop で制限した範囲にのみキャレットが表示されるようになります。 jump を設定すると可視部が一度により大きく移動するようになります。従って同一方向に連続移動しても可視部の再移動の頻度は下がります。 even が設定されていれば対称的な位置溢れ区間を持ちます。そうでなければ左の位置溢れ区間は右の同区間開始位置まで拡げられます。同様に上の区間は下の区間の開始位置まで拡げられます。 具体的な組み合わせと挙動の一覧は別表を参照ください。 |
|
visible.policy.strict visible.policy.slop visible.policy.lines |
「位置指定移動」や「検索」、「次のメッセージ」などを実行した後の表示についてを設定します。指定値は caret.policy.* と同じです。 |
|
edge.mode edge.column edge.colour |
長い線についての特性です。edge.mode を省略するか 0 を設定した場合は長い線は表示されません。1 を設定すると要求された列(edge.column) を縦線で示します。2 を指定するとその列の背景色が変わります。プロポーショナルフォントを使っているときは edge.mode を 1 ではなく 2 にするとより便利です。 |
| control.char.symbol | 設定すると制御文字の表示が可能となります。そうでなければ記憶されているだけの表示を行います。 |
|
error.marker.fore error.marker.back |
エラーや警告の行を示すための色を設定します。編集部と出力部の両方で有効です。各表示区画に余白があれば、編集部についてはエラーメッセージの示す行、出力部についてはエラーメッセージの部分に印が表示されます。error.marker.back は塗りつぶす色に、また error.marker.fore はその境界線を示す色に使われます。余白がない場合は当該行の背景色に error.marker.back が使用されます。 |
| error.select.line | コマンドを実行してエラーメッセージを出力され、F4 キーで該当するソースファイルの各行を巡っているとき、error.select.line はエラーを起こした行を選択します。メッセージがエラー発生桁まで示していれば、そこから選択できるので一番便利です。そのエラーメッセージは桁情報を含み、また SciTE が理解できなくてはなりません。現在は HTML Tidy のみに対応しています。正確な桁位置を得るためには、外部のツールとソースファイルのタブの大きさが一致している必要があります。 |
| openpath.filepattern | ファイルメニューの「選択文字列をファイル名として開く」で使うパス名を定義します。選択文字列が絶対パスではなかった時や編集中のファイルがあるディレクトリに見つからなかった場合、ここで指定したパスが検索されます。複数のディレクトリを指定するときは区切り文字として Windows では ';' を GTK+ では":" を使います。 openpath は次のような形で指定します。 openpath.*.txt=c:\dos\;f:\;
|
| open.suffix.filepattern | ファイルメニューの「選択文字列をファイル名として開く」を使う際に接尾辞として追加される文字列を定義します。これはファイルを扱う際に接尾辞を省略してしまうプログラミング言語で使います。例えば python ソースの中の "import xlib" はほとんどの場合 "xlib.py" という名前のファイルから import することを意味しています。 open.suffix は次のような形で指定されます。 opensuffix.*.py=.py
|
| strip.trailing.spaces | 保存するときに行末のホワイトスペースを削除します。 |
| ensure.final.line.end | 保存するときにファイルの終端が改行であることを保証します。 |
| ensure.consistent.line.ends | 保存するときに現在の行末文字設定がすべての行に適用されることを保証します。 |
| api.filepattern | 指定のプログラミング言語用 API ファイルを定義します。複数の API ファイルがある場合は ';' でファイル名を区切ります。API ファイルには、識別子や関数の雛形が一行に一つずつ書かれていて、名前による並べ替えの済んでいる一覧を持たせます。「識別子補完」はキャレットの前の文字を調べ API ファイル内の当該文字列を先頭に持つ識別子の一覧を作ります。開き括弧が入力されるとキャレットの前の文字列に該当する関数名を検索し、もし見つかれば呼び出し方の簡単な説明として表示されます。例えば次のような設定は
api.*.c=w.api次のような w.api ファイルを呼び出すことができ、
fclose(FILE* fileClose)いくつかの自動補完や簡単な呼び出し規約を提供します。フルパス名がないと編集中のファイルのディレクトリが使われてしまいます。API ファイルを作るには「API ファイルの作成」節を参照ください。 |
| autocomplete.choose.single | 1 を設定すると、自動補完の一覧を検索したときに該当する要素が一つしかなければそれを選択・決定します。従って該当一覧は表示されず、その要素はいきなり本文に挿入されます。 |
|
autocomplete.解析器.ignorecase autocomplete.*.ignorecase |
1 を設定すると、自動補完の要素検索の際に大文字小文字を区別しません。それ以外の場合は大文字小文字の完全一致も合致の条件となります。 * を使う設定方法は解析器が無いときの設定です。 |
|
calltip.lexer.parameters.start calltip.lexer.parameters.end calltip.lexer.parameters.separators calltip.*.parameters.start calltip.*.parameters.end calltip.*.parameters.separators |
大部分のプログラミング言語(等)で { と } が start と end, コンマかセミコロンが separator になります。例えば CSS はコロンを start, 空白を separator に持ち、end に対応するものはありません。各特性ともより多くの文字を与えることができます。* 形式は解析器に依存しない設定です。 |
|
autocomplete.解析器.start.characters autocomplete.*.start.characters |
空文字列以外が設定されていると、その中のいずれかが入力された時点で自動補完がはじまります。例えば autocomplete.python.start.characters=. という設定があって Python 用 API ファイルが "string.rjust" と "string.replace" の要素を持っているとすると "string." と入力したときに両方の要素が表示されます。 * を使う設定方法は解析器が無いときの設定です。 |
|
autocomplete.解析器.fillups autocomplete.*.fillups |
空文字列以外が設定されていると、その中のいずれかの文字が入力された時点で自動補完が完結します。 例えば autocomplete.python.fillups=( という設定があって Python 用 API ファイルが "string.replace" の要素を持っているとすると "string.r(" と入力したときに "string.replace(" が挿入されます。* を使う設定方法は解析器が無いときの設定です。 |
| autocompleteword.automatic | 1 を設定していると、単語を入力したときにその文書内でその文字から始まる単語がひとつしかなければ、その単語とともに自動補完一覧が表示されます。Tab キーを押すことで選択が可能です。 |
|
calltip.解析器.ignorecase calltip.*.ignorecase |
1 を設定すると API ファイルへ関数名を検索する際に大文字小文字を区別しません。簡易呼び出し方法解説になっている要素に対して有効です。 * を使う設定方法は解析器が無いときの設定です。 |
|
calltip.解析器.word.characters calltip.*.word.characters |
To determine the identifier to look up for calltips, a search is performed allowing the characters in this set to be included in the identifier. While the same setting can be used as for word.characters, sometimes additional characters may be allowed.コールチップ用の識別子を定めるため、この特性で指定した文字群を識別子に含めることを認めます。通常 word.characters と同じ指定を行いますが、場合によってはそれに何文字か加えて指定されることがあります。例えば Python では、文字列選択範囲の '.' は単語の一部分とは通常みなされません。ですが、"string.replace" で簡易呼び出し方法解説が出てくると便利ですから calltip.python.word.characters=._$(chars.alpha) という設定が実用的と言えます。* を使う設定方法は解析器が無いときの設定です。 |
|
calltip.解析器.end.definition calltip.*.end.definition |
API ファイルは関数定義の後に各々説明文を持っていることがあります。この説明文を二行目に表示する際、当特性に設定した文字を関数の定義部終端とします。多くのプログラミング言語では ')' です。 |
| calltip.back | 簡易呼び出し解説文の背景色を設定します。省略すると白になります。 |
| xml.auto.close.tags | XML や HTML 用です。この設定を 1 にしておくと 開始タグの終わりの '>' を入力した時点で自動的に対応する終了タグを挿入します。"<td>" を入力すると "<td></td>" が挿入され、タグの間にキャレットが移動します。 |
| html.tags.case.sensitive | XML や HTML 用です。この設定を 1 にしておくと、タグの大文字あるいは小文字を統一しようとします。これは XML や XHTML で要求されている事項です。 |
| asp.default.language | ASP 内のスクリプトは標準で Javascript を仮定しています。VBScript に変更するときは 2、Python にするときは 3 を設定してください。 |
| sql.backslash.escapes | SQL において逆スラッシュをエスケープ文字として使えるようにします。 |
| styling.within.preprocessor | C++ 用です。 1 を設定をすると、プリプロセッサ文のうち先頭の # と指示単語のみが書式を変更されます。省略値は 0 で、この場合はプリプロセッサ文の全体が書式を変更されます。 |
| tab.timmy.whinge.level | Python 用です。字下げ一貫性の検査方法を設定します。省略値は 0 で、このとき字下げの一貫性は検査されません。1 にすると一行毎に前の行との潜在的な不一致を検査します。2 を設定すると字下げのタブ文字の前に他の空白文字類がないかどうかを検査します。3 の場合は字下げに空白文字がないかどうかを、4 の場合は字下げにタブ文字がないかどうかを検査します。 1 を推奨します。 |
| user.shortcuts | SciTE に様々な処理を行わせるためのキー操作を定義します。'|' でキー操作と処理を区切ります。処理を表す方法は文字列か識別番号です。2000 以上の識別番号が Scintilla の機能に対応しており、フォーカスを受けているペインに送られます。2000未満が SciTE のメニューに対応しており scite/src/SciTE.h がその一覧となります。補助キーには Ctrl, Shift, Alt が指定でき、名前で指定するキーには Left, Right, Up, Down, Insert, End, Home, Enter, Space, KeypadPlus, KeypadMinus, Escape, Delete, PageUp, PageDown, Slash, Question, Equal があります。(訳注:日本語キーボードでは英語圏とのキーボードの違いから Equal やいくつかの記号が違う動作をする可能性がある。)
user.shortcuts=\
|
|
magnification output.magnification |
編集部と出力部の拡大率を設定します。画面の解像度を変えたときに、各々の修飾表示設定を修正せず全体の文字の大きさを変えたいときに便利です。0 が省略値で負数のとき文字は小さくなり正数では大きくなります。 |
|
split.vertical output.horizontal.size output.vertical.size |
split.vertical を 1 に設定すると出力部が編集部の右に配置されます。0 であれば下に配置されます。output.*.size には出力部の起動時の大きさを設定します。 |
| clear.before.execute | 1 を設定するとツールメニューで指示を出すたびに出力部を白紙に戻します。 |
|
horizontal.scrollbar horizontal.scroll.width output.horizontal.scrollbar output.horizontal.scroll.width output.scroll end.at.last.line |
horizontal.scrollbar を 0 に設定すると編集部の水平スクロールバーが表示されません。 horizontal.scroll.width はスクロールのために保証される文書の幅です。 同様に出力部の水平スクロールバーについては output.horizontal.scrollbar と output.horizontal.scroll.width を用いて設定できます。 出力部の自動スクロールを抑止するには output.scroll を 0 にしてください。1 にすると出力部はスクロールし、終了後に実行にもちいた指示がある行に戻ってきます。終了後も実行中のスクロールを戻さないときは 2 を設定します。 垂直スクロールは、通常一番下にスクロールしたときに文書の最後の行が一番下に表示されています。end.at.last.line を 0 にすると文書の最終行が表示されてからさらに一ページ下までスクロールできるようになります。 |
|
wrap output.wrap |
wrap を 1 に設定すると編集部が動的に行クリップされます。output.wrap は出力部について同じ動作をします。これらのオプションは多くのテキストをプロポーショナルフォントで表示する際、高い処理能力を求められます。大きな文書を遅い機械で扱うときはこれらを無効にしておくべきです。なお、両方とも 2 を設定することができます。これは文字単位の行クリップで、訳者が日本語のために実装したものです :D |
| wrap.visual.flags | 行クリップが行われたことをその行の両端に表示するかどうかを定めます。省略値は 0 で表示しません。1 の時は当該行の終端に、 2 の時は同開始端に表示します。3 で両端に表示されます。 |
| wrap.visual.flags.location | 位置表示をテキストの近くに出すか外枠の近くに出すかを定めます。省略値は 0 で開始・終了の印とも外枠の近くに表示します。1 の時は終端がテキストの近くとなり 2 の時は開始端がテキストの近くとなります。3 は全ての印をテキストの近くに表示します。 |
| wrap.visual.startindent | クリップされて複数行表示になった行の二行目以降を何文字字下げするかを定めます。省略値は 0 で字下げは起こりません。ただし wrap.visual.startindent が 0 でも wrap.visual.flags が 2 または 3 (開始端に印を表示)の場合、当該行は必ず一字字下げされます。 |
| wrap.aware.home.end.keys | この特性は動的行クリップが起きた場合の Home キーと End キーの動作を設定します。省略値は 0 で、これらのキーは行クリップに関係のない論理行の先頭や終端への移動を意味します。1 を設定すると、キャレットは表示されている行の端へ移動します。さらに続けて同じキーを押したときは論理行の端へ移動します。行クリップ自体が無効の時は意味を持たない特性です。 |
|
cache.layout output.cache.layout |
文字を表示するには各文字の配置を定める必要がありますが、この計算は多くの時間が必要です。計算結果の一部は再描画の際にも変化がない場合があり、前の計算結果を再利用可能なことがあります。四段階のキャッシングがあり 0 はキャッシングを行いません。1 はキャレットがある一行について、2 はキャレットとともに見えている部分について、3 は文書全体についてキャッシングを行います。キャッシュした分以上に多くのメモリが使用され、3 を設定したときは文書内の文字の七倍を要します。しかしながら 3 を設定してるときは大きなソースファイルに対して動的行クリップの処理速度がおよそ 25 倍という劇的な高速化に繋がります。ですから、行クリップを有効としていて、かつメモリが充分にある場合はとても有効な設定です。 |
| open.filter | 「ファイルを開く」ダイアログで選択可能なファイルの種類を定めるための複雑な表記をここで設定します。各々のファイル種別について、説明文・ '|' の文字・filepattern・もう一つの '|' 文字を記述します。 配布された SciTEGlobal.properties ファイルでは行を続ける文字 '\' を利用して縦に展開し、一行に一つを記述しています。これらのファイル種別は「ファイルの種類」と書かれたプルダウンメニューで使用されます。最初の一組が初期値となりますので、各自が一番使う種類の設定を最初に持ってきて記述し直すとよいでしょう。 GTK+ では 2.4 以降で有効となります。 |
| max.file.size | 遅いデバイス上から大きなファイルを読み出そうとするのを抑止します。あるいは、SciTE は人が読めるコードのみを編集することを保証するためにも使えます。max.file.size 特性には読み出すファイルサイズの上限を指定します。未設定もしくは 0 の場合は無制限に読み込みます。もし指定のオクテットサイズに達した場合、ユーザに読み込みを続けるかどうか尋ねられます。許可されれば通常と同じように読み込まれ、拒否されればファイルの読み出しもバッファの作成も行われません。 |
| save.deletes.first | 1 に設定すると保存する前に元のファイルを削除します。Windows では既存のファイルに対して大文字小文字が一致しないファイル名を使ったとき、既存のファイル名のほうが指定されたものとしてファイルを上書きしますが、この設定が有効である場合は新しいファイル名が古いファイル名のファイルと置き換わることを保証できます。 |
|
save.recent save.session |
seve.recent を 1 に設定すると最近編集されたファイルの一覧が終了時に保存され、起動時に読み込まれるようになります。この一覧は Windows では "SciTE.recent"、GTK+ では ".SciTE.recent" のファイル名で環境変数 SciTE_HOME が示すディレクトリに格納されます。SciTE_HOME が無ければ HOME 、それも無ければ GTK+ では最上位のディレクトリに、Windows では SciTE の実行可能バイナリがあったディレクトリに格納されます。 "save.session=1" と設定すると現在のセッションが自動で保存されます。Windows では "SciTE.ses"、 GTK+ では ".SciTE.ses" と言うファイルが前述同様に置かれます。 次回の SciTE 起動時に最後のセッションが自動的に読み出されます。 |
| open.dialog.in.file.directory | open.dialog.in.file.directory を 1 に設定すると、ダイアログを開いたとき編集中のファイルと同じディレクトリを初期ディレクトリとして使用します。設定されていなければシステムの省略値が使用されます。Windows 2000 では SciTE 上で「ファイルを開く」ダイアログを用いて最後に開いたディレクトリを開くことになりますが、SciTE を複数起動できる設定の場合は使いこなすのは難しいでしょう。 |
|
find.replace.matchcase find.replace.regexp find.replace.wrap find.replace.escapes find.replacewith.focus |
この特性は検索・置換条件の初期設定を定義します。find.replace.matchcase は「大文字小文字の区別」、find.replace.regexp は「正規表現」、find.replace.wrap は「終端に達したら逆の端から続ける」、find.replace.escapes は「\表現を変換」に対応します。 find.replacewith.focus が設定されているときは、置換ダイアログが起動する際に検索文字列が空でない限り置換文字列側にフォーカスが来ます。 |
| find.replace.regexp.posix | 正規表現検索の挙動を設定します。省略値は 0 で、このとき '(' と ')' を抽象文字として使用するには '\' でエスケープしなければなりません。1 の場合は '(' と ')' は単独で抽象文字となります。 |
|
find.command find.input |
ビルド指示でコマンドラインツールを起動し出力部にその出力を取り込むといった流れは「ファイル内を検索」でも用いられます。コマンドがエラーの一種と理解されるものを出力する場合、例えば grep の出力のようなものは F4 キーと Shift+F4 の操作ですべての合致部を巡ることができます。「ファイル内を検索」ダイアログで入力した値を持つ変数 $(find.what), $(find.files), $(find.directory) を利用することができます。 grep よりも高機能の検索機能を持つ Perl スクリプトがいくつかあります(jenda.krynicky.cz/SciteFind, www.forusers.com/forme/finder.zip)。この特性は Windows 上の Cygwin で動作します。次のような形になりますが、Cygwin を置いたディレクトリの表記を各自の環境に合わせてください。
find.command=cmd /c c:\cygwin\bin\find "$(find.directory)"
-name "$(find.files)" -print0 |
c:\cygwin\bin\xargs -0 fgrep -G -n "$(find.what)"
Windows では探す文字列を検索コマンドに渡す際に標準入力ストリームを利用可能です。これにより引用符の解釈にかかる問題を回避することができます。find.input に $(find.what) を設定してください。 |
| find.files | 「ファイル内を検索」で使われるファイル種別を設定します。find.files はファイル種別の組一覧を '|' で区切って指定でき、先頭の組が初期設定となります。例えば "*.cxx *.h|*.py *.pyw|*.html" という設定では三つの組が指定されています。 この設定の利点は少し特殊なものです。特性ファイルごとに存在するこの設定がそれを見つけた SciTE にとって未知のものであれば履歴に追加されていきます。言い換えると SciTE で異なるディレクトリからファイルを開くと各々の find.files の内容が一覧に加えられていくことになります。 |
| find.in.files.close.on.find | 「検索」を実行したときに「ファイル内を検索」ダイアログが閉じられるのを防ぐには find.in.files.close.on.find に 0 を指定してください。 |
| code.page | 日本語のような DBCS 言語を使う場合はコードページと呼ばれるものをここで設定できます。この指定により一文字で 2 バイトを使う文字も確実に一文字として認識されるようになり、キャレットが二つのバイトを割る位置に来ることは決して起こらなくなります。Windows では、次の指定が動作します。932 (日本語 Shift-JIS), 936 (簡体中文, GBK), 949 (韓国語), and 950 (繁体中文, Big5). GTK+ では 0 か 65001 のみを指定でき、前者が単バイト文字のみ、後者がユニコードとなります。 code.page に 65001 を設定するとユニコードで処理するようになり UTF-8 で文書内の文字列が記されているものとみなします。最初に各環境が標準とするユニコード変換を行ってから表示するため、どの言語の文字も表示されます。文字に対して適切な字形を持っているフォントが選択されているときのみ当該字形を表示できます。Windows 2000 では Tahoma フォントがよいでしょう。 GTK+ においては LC_CTYPE 特性でユニコードロケールを設定しなくてはなりません。英語環境では次のような形になります。
LC_CTYPE=en_US.UTF-8
"iso10646" が登録されているフォント群を使用すべきです。フォント群は次のいずれかの形を取る部分的なフォント仕様を '|' で組み合わせたものです: foundry-fontface-charsetregistry-encoding 例えば "misc-fixed-iso10646-1|*" といった表記になります。
|
| character.set | この設定はフォントを準備する際の文字群の種類を定めます。ロシアのキリル文字を使うには character.set に 204 を指定します。その他次の値が動作します。 中国語(GB2312=134 or BIG5=136)・韓国語(129)・ギリシア語(161)・東欧諸語(238)・バルト諸語(186)・トルコ語(162)・ヘブライ語(177)・アラビア語(178)・タイ語(222)・日本語(128) Windows では上記の値が全て動作しますが、GTK+ ではバルト諸語・トルコ語・タイ語・ベトナム語はおそらく動作しません。この設定を使う方は実際に動作するかどうかを、また他の言語にどうすれば対応できるかをご存じの方はそのことについてのメールを頂けると幸いです。 |
|
comment.block.解析器 comment.block.at.line.start.解析器 comment.stream.start.解析器 comment.stream.end.解析器 comment.box.start.解析器 comment.box.middle.解析器 comment.box.end.解析器 |
これらの設定は編集メニューの「注釈」関連のものです。解析器ごとに指定できます。全種類の文書でストリーム注釈とブロック注釈が可能なわけではありません。 ブロック注釈は特定の文字列から行末までを注釈とするものです。comment.block にはブロック注釈/解除を行う際に開始文字として認識される文字列を設定します。すでに注釈や他のコードがあるテキストに対してよりうまく動作するさせるために、実際の注釈では使われない文字(例えば '~' )を含めて定義することができます。comment.block.at.line.start を 1 に設定すると行頭に注釈文字を置きます。そうでないときは最初の非空白文字列の直前に置きます。 ストリーム注釈とは、開始端と終端に各々特定の文字列を用いた行をまたいで効力をもつ注釈です。comment.stream.start と comment.stream.end で定義します。 ボックス注釈は複数行の注釈の中で開始行・終了行・その他の行で別々の文字列を持っています。これらは comment.box.start, comment.box.middle, comment.stream.end で定義します。 |
|
preprocessor.symbol.filepattern preprocessor.start.filepattern preprocessor.middle.filepattern preprocessor.end.filepattern |
条件分岐プリプロセッサを定義することで選択の動作を定めます。プリプロセッサ行と判定する文字は preprocessor.symbol で定義します。条件判断用プリプロセッサの開始 (if), 中間 (else), 終了(endif) キーワードは残りの三種の特性で定めます。各々が複数の値を取ることがあります。例として C 言語では "if", "ifdef", "ifndef" が条件分岐プリプロセッサとして用いられます。 |
| lexer.filepattern | 解析器はファイルを文法的部品に分割します。SciTE はこの部品ごとに異なる視覚効果を与えることができます。Python, Java, C/C++, JavaScript, VB といった普及しているプログラミング言語の一部には複数の解析器があります。単一の言語、すなわち単一の解析器に複数の拡張子を割り当てることができます(C++ に対する .cpp, .cc, .h など)。これらの設定はファイル名と解析器が一対一で対応しています。 |
| lexerpath.filepattern | Scintilla に読み込まれる外部解析器へのパスを与えます。 |
|
keywords.filepattern keywords2.filepattern keywords3.filepattern keywords4.filepattern keywords5.filepattern keywords6.filepattern keywords7.filepattern keywords8.filepattern keywords9.filepattern keywordclass.解析器 |
ほとんどの解析器は名前とキーワードを区別し、またそのためにキーワード変数を使っています。複数のファイル拡張子が一つのプログラミング言語に使われるとき、その拡張子ごとにキーワード一覧を繰り返すことを避けるため、配布している特性ファイルの中で keywordclass 変数を定義しています。これは慣習として使われています。いくつかの解析器は二組のキーワードを定義し、一方が他方とは異なる表示を持っていることがあります。この手法は HTML 解析器が JavaScript のキーワードを HTML のタグや属性とは異なる外見で表示することに用いられます。 キーワードは接頭辞を基準とすることができます。そのため ^GTK_ という表現は GTK_ ではじまる全単語をキーワード扱いにします。 |
| default.file.ext | 新規ファイルに名前を付けるまでの仮文書種を指定します。例えば default.file.ext=.py という設定は、新規作成ファイルの名前を定めるまで Python 文法に基づいた表示を行います。 |
| word.characters.filepattern | どの文字が単語の一部になりうるかを定義します。省略すると、全てのアルファベット及び数字と下線を指定したものとみなします。これは C++ などのプログラミング言語に適しています。 |
| whitespace.characters.filepattern | ホワイトスペース扱いとなる文字を定義します。Scintilla で用意される省略値は 0x20 以下の全ての文字です。この特性を用いると Scintilla が他の文字をホワイトスペースとみなすように強制します。Ctrl + ←/→ といった移動の際に例えば句読点で停止させることができるようになります。 |
|
style.*.stylenumber style.解析器.stylenumber |
解析器は解析型ごとに文体番号を定めます。解析型とはキーワード、注釈、あるいは数値といったものです。これらの設定が各々の解析器における文体番号ごとの視覚効果を決めることになります。 各設定値は ',' で区切られた欄の組で構成され、各欄はさらに ':' で区切られた下位の設定値を持つことがあります。欄で設定できるのは font, size, fore, back, italics, notitalics, bold, notbold, eolfilled, noteolfilled, underlined, notunderlined, case です。font, fore, back は色の、size は数値の、case は 'm', 'u', または混合のための'l' の下位設定値を持ちます。case の下位設定値は大文字か小文字かを表します。bold, italics, eolfilled には下位設定値はありません。"fore:#FF0000,font:Courier,size:14" は 14 ポイントの赤いクーリエ書体を意味します。 style.*.stylenumber で全般の文体を指定することができます。全般の文体で指定したものは各々の文体で上書きされない限り継承されます。 GTK+ では Pango アンチエイリアスフォントを選択できます。フォント名に "!" を先行させて、例えば "font:!Sans" のように指定してください。 |
|
style.解析器.32 style.解析器.33 style.解析器.34 style.解析器.35 style.解析器.36 style.解析器.37 |
解析による書体同様、他の番号で書体を指定することができます。 32 は基本書体です。他で上書きされない限りは継承されます。 33 は余白部に表示される行番号、34 は 対応が取れる括弧、35 は逆に対応が取れていない括弧、36 は制御文字について指定します。制御文字の文字色・背景色は、文字の状態によって定められるためここでの設定は意味を持ちません。 37 は字下げのガイドの表示に関するもので、fore と back のみが有効です。 解析器を指定する代わりに * を置いて全般の書体を指定することができます。 |
|
braces.check braces.sloppy style.解析器.34 style.解析器.35 braces.解析器.style |
括弧の直後にキャレットがあるとき、その括弧の効力を強調して示すことができます。複雑に包含された括弧群に対して特に有効です。'(', ')', '[', ']', '{', '}' が括弧として認識されます。この機能はキャレットの動きを遅くしてしまうため、braces.check を 1 に設定しない限り機能しません。braces.sloppy を 1 に設定するとキャレットの前に括弧がないときにキャレットの後の文字が強調されます。括弧の強調は 34 番で定義された書体を用います。対応すべき括弧がないときは 35 番が用いられます。これらは括弧について完全な書式を指定できますが、標準の括弧の書式に文字色と背景色だけを変えたものが一番よい設定値です。braces.解析器.style (省略値は 0) が 1 になっている解析器だけで括弧が強調されます。 |
| font.monospace | 書式特性と同じ方法で、固定幅フォントとして使うフォントの名前と大きさを定義します。「固定幅フォントを使用」というメニューがあります。 |
|
command.compile.filepattern command.compile.subsystem.filepattern command.build.filepattern command.build.subsystem.filepattern command.build.directory.filepattern command.go.filepattern command.go.subsystem.filepattern |
コンパイル・ビルド・実行の各メニューを使ったときにどのように対象を呼び出すかを設定します。subsystem は Windows でコマンドライン(0), GUI アプリケーション(1), ShellExecute経由(2), あるいは director 経由(3) であることを定めます。 もし異なるディレクトリのソースファイルをビルドしなくてはならない場合は command.build.directory でビルド前に特定のディレクトリを設定できます。 |
|
command.go.needs.filepattern command.go.needs.subsystem.filepattern |
ときどき実行する前にコンパイルかビルドを必ず行わなければならない場合があります。ここでの設定は「実行」するにあたりコンパイルやビルドの段階をも実行するには何が要るかを定めます。ファイルがコンパイルを終了するとそのことが記憶され、以後の実行ではコンパイルやビルドが行われません。次の記述は .c ファイルについて「実行」が“コンパイルして実行”になります。
command.go.*.c=$(FileName)
|
|
command.name.番号.filepattern command.番号.filepattern command.is.filter.番号.filepattern command.subsystem.番号.filepattern command.save.before.番号.filepattern command.input.番号.filepattern command.replace.selection.番号.filepattern command.quiet.番号.filepattern command.mode.番号.filepattern command.shortcut.番号.filepattern |
ツールメニューに拡張命令を追加することができます。例えば 'astyle' 字下げソフトを加えるには特性ファイルに次のような記述をします。
command.name.0.*.cc=Indent一行目はツールメニューに追加されるメニューの文字を定義します。位置は「実行」のすぐ下です。二行目はコマンドライン文字列でコンパイルやビルド・実行のそれと同様のものです。追加したコマンドが現在編集中のファイルを変更するもので、load.on.activate が設定されているときは再読込が必要となる場合には上記のように command.is.filter 特性を 1 に設定します。 subsystem は Windows においてどのように実行されるかを指定します。コマンドライン(0), GUI アプリケーション(1), ShellExecute経由(2), 内部拡張もしくは director 拡張経由(3) であることを設定します。4 は HtmlHelp 、 5 は WinHelp を使うことを意味し、これらの場合は ! で区切られた前半のトピック名で後半のヘルプファイルを検索することになります。 command.save.before を 1 に設定すると SciTE は実行の前に保存します。2 を設定したときはユーザへの問い合わせが発生します。 Windows では command.input 特性でコマンドにパイプで文字列を渡すことができます。例えば次の例では選択文字列をコマンドプロセスにパイプで渡すことができます。 command.input.0.*.cc=$(CurrentSelection)command.input は subsystem 0 (コマンドラインプログラム)に限り有効です。 また Windows では command.replace.selection を設定することにより出力で選択部を置換することができます。選択部がなければキャレットの後ろに挿入されます。この特性は三種の値が設定可能です: 0 は省略値で置換を行いません。1 はコマンドが終了したときに置換します。2 だと終了コードが 0 の時だけ置換を行います。ツールメニューの「実行の中断」を使った場合はいずれの場合でも置換は発生しません。注意点として、コマンドは非同期的に実行されるため、その間に文書の変更はもとより編集バッファの交換さえできます。このときコマンド実行が完了した時点でどのウィンドウがアクティブでもそこに出力結果が送られることを忘れないでください。 もう一点 Windows のみで使用できる特性があります。command.quiet に 1 を設定するとコマンド入出力は出力部に反映されません。これは command.input や command.replace.selection とともに使うと有効です。 command.mode 特性はコンマで区切られたフラグや設定の一覧です。各モードはコロン記号で区切られた引数を持つことができます。引数の大部分は省略できます。設定名が引数なしで現れた場合は "設定:yes" として動作します。command.mode に設定されたものが個々のコマンド特性に現れた場合は上書きされます。異なる引数に同じ設定が複数回現れた場合も最後の有効な引数型を上書きします。 command.mode で使用できる設定は次の通りです。 filter - yes, no quiet - yes, no replaceselection - yes, no, auto savebefore - yes, no, prompt subsystem - console, windows, shellexec, lua, director, winhelp, htmlhelp groupundo - yes, nogroupundo を除く設定は個々の特性名が意味を持っており、引数は同じような名前を持っているのでここでは細かく説明しません。groupundo は subsystem 3(lua / director) で動作します。これはコマンドで変更されたもののやり直しは一回で行う指定です。groupundo 設定を使うコマンドはエディタ上のアクティブバッファを変更すべきではありません。 command.shortcut 特性でキーボードショートカットをコマンドに割り当てることができます。省略するとコマンド 0 〜 9 と Ctrl+0 〜 Ctrl+9 が対応します。9 を越えるコマンド番号は省略時のキーボードショートカットはありません。キーボードショートカットに使われる注意書きについてはuser.shortcuts と同じです。 コマンド文字列が '*' で始まっている場合、実行前に引数入力を求めるダイアログが現れます。この '*' 自体は実行されるコマンドに含まれません。 |
|
command.help.filepattern command.help.subsystem.filepattern |
説明書が呼び出されるか F1 キーが押されるかしたときに実行されるコマンドを定義します。Windows ではしばしば subsystem 4 が前述の通りに使われます。Linux では man もしくはブラウザが説明書を表示する一般的な方法です。キャレット位置の単語が $(CurrentWord) に複製されます。これは説明書アプリケーションによく使われる引数となります。subsystem 特性は他のコマンド同様に動作します。 |
|
command.scite.help command.scite.help.subsystem |
SciTE 自身の説明書を呼び出すコマンドを定義します。通常はこのファイルをブラウザで表示させることになります。 |
|
command.print.filepattern command.print.subsystem.filepattern |
GTK+ で印刷を実行するときのコマンドを定義します。 |
| win95.death.delay | Windows 95 ではプロセスの終了後、そこからの出力をパイプした結果を得るまでの遅延を設定することができます。ミリ秒単位の待ち時間を設定すると、確実に出力全てを得ることができます。省略値は 500 ですが遅い機械ではもっと大きな数値にする必要があるかもしれません。 |
| time.commands | 1 を設定するとコマンドが実行完了した際に何秒かかったかを表示します。 |
| print.magnification | 印刷は通常スクリーン表示と同じ設定で行われます。print.magnification の値は印刷時の全フォントの大きさに加算されます。 うまく文字を小さくして印刷するには print.magnification に -4 を設定するとよいでしょう。 |
| print.colour.mode | 人によっては、白紙に濃い色の文字より明るい文字が暗い背景に載っている方がよいと考えます。print.colour.mode が 1 に設定されると各々の印刷色が逆転します。2 の場合は白地に黒文字となります。3 の時は背景を強制的に白とし、4 の時は省略されている背景色について強制的に白とします。 |
| print.margins | Windows において、印刷時の余白を左右天地の順で設定します。単位は環境により 1/100 ミリ単位か 1/1000 インチ単位となります。印刷設定のダイアログでどの単位が使われているか調べることができます。この特性は起動時にのみ参照されます。 |
|
print.header.format print.footer.format |
印刷時に最上部・最下部に加える文字の内容を設定します。$(特性) の書式を用いて特性値を代入することができます。印刷の際にはいくつかの追加特性が準備されます: CurrentPage, FileTime, FileDate, CurrentDate, CurrentTime (これは印刷開始時の時刻です)。ヘッダとフッタに共通して使われる特性は FileNameExt と FilePath です。次の一行はヘッダ設定の例です。
print.header.format=$(FileNameExt) - Printed on $(CurrentDate),$(CurrentTime) - Page $(CurrentPage)
|
|
print.header.style print.footer.style |
他の書式指定で使われるものと同様の fore, back, font, size, bold, italics, underlined を用いてヘッダやフッタの書式を定義します。 |
| export.keep.ext | 「変換して出力」する際に、新しいファイルの名前に変換元ファイルの拡張子をどう残すかを設定します。省略値は 0 で、単に変換元の拡張子は消去されます。1 を設定すると、拡張子を含めた変換元ファイル名に変換先の拡張子を加えます。2 を設定すると変換元の拡張子の前の '.' を '_' に置き換えた上で変換先の拡張子を加えます。LineMarker.cxx という変換元ファイルを HTML に変換する場合、新しいファイルの名前は次のようになります。
|
|
export.html.wysiwyg export.html.tabs export.html.folding export.html.styleused export.html.title.fullpath |
export.html.wysiwyg が 0 に設定されていると HTML に変換して出力されたファイルはより小さくなりますが完全さに欠き、見た目が変わることがあります。export.html.tabs を 1 に、かつ export.html.wysiwyg を 0 に設定しているとタブ文字は空白文字の並びではなくタブ文字として出力されます。 export.html.folding を 1 にしておくと、出力された HTML ファイルでも折りたたみが可能となります。これは CSS に充分に対応しているブラウザ(Mozilla や Internet Explorer)で有効です。export.html.styleused が 1 に設定されているときに限り「変換して出力」の各書式が実際に用いられます。export.html.title.fullpath が 1 に設定されているときはファイルのフルパス名がタイトルに用いられます。そうでないときはファイル名のみとなります。 |
|
export.rtf.wysiwyg export.rtf.tabs export.rtf.font.face export.rtf.font.size export.rtf.tabsize |
export.rtf.wysiwyg と export.rtf.tabs は html に関するものと同様です。 export.rtf.font.face と export.rtf.font.size を用いると出力される RTF ファイルに特定のフォントとその大きさを指定することができます。export.rtf.tabsize は tabsize の定義とは異なるタブ幅を使うときに利用できます。 |
|
export.pdf.magnification export.pdf.font export.pdf.pagesize export.pdf.margins |
export.pdf.magnification は使用中の画面でのフォントサイズに加算される値です。正の数を設定すると PDF 文書内の文字が大きくなります。 export.pdf.font は PDF で使われる基本フォントを指定します。これは次のような一単語で定義します: Courier, Helvetica, Times 。省略すると Helvetica になります。Helvetica と Times は行クリップを行いません。Courier は行います。 export.pdf.pagesize は文書の一頁の大きさを定めます。単位はポイント(1/72 インチ)です。例えばレター(8.5 x 11 インチ)の大きさは 612,792 という値で定義します。 export.pdf.margins はページの余白幅を定めます。省略値は 72 point (1 inch) です。 PDF は archival format (訳注:意味がわからない) であるため、PDF への変換出力はどうしても機能が制限されたものとなります。PDF の全機能に対応しようとすると SciTE の実装は巨大なものにならざるを得ません。Helvetica や Times の行クリップを完全に可能とするにはフォントのメトリック(訳注:metrics)や文字間隔調整の複雑さを考慮しなくてはなりません。PDF への変換は WinAnsiEncoding を利用します。そのため、拡張文字を使いたい場合は事前の(訳注:おそらく自前で)エンコードを実行しておく必要があります。 |
|
export.xml.collapse.spaces export.xml.collapse.lines |
export.xml.collapse.spaces と export.xml.collapse.lines は XML に変換する際に空白文字群の列や空行群をどう扱うかを定めます。 1 を設定するとそれぞれ圧縮されるようになります。タブ文字は tabsize 特性に基づき常に空白文字に変換されます。 |
|
fold fold.margin.width fold.symbols fold.on.open |
折りたたみを制御します。fold に 1 を設定すると折りたたみが使えるようになります。fold.symbols で折りたたみに関する四種の表示方法を設定します。省略値は 0 で MacOS 風の表現です。折りたたまれていると右の矢印を、拡げられていると下の矢印を表示します。1 を設定すると折りたたみ時に '+' 、展開時に '-' を表示します。2,3 は平らなツリーコントロールを使用します。2 では丸いヘッダ、3 では四角いヘッダになります。読み出した時点で折りたたみをできるだけ閉じておくには fold.on.open に 1 を設定しておきます。 |
| fold.flags | (完全には文書化されていません)ビット指定のフラグは将来廃止される可能性があります。2, 4, 8, 16 は折りたたみ可能行の上、下、またその行の展開時、非展開時に線を引きます。64 を指定するとデバッグ用に16進数で折りたたみの深さを余白に表示します。 |
|
fold.compact |
HTML, XML, Lua, C++ などのファイル用です。省略値は on で、要素が終了した直後に続く空行も直前の折りたたみの対象になります。 |
| fold.html | HTML と XML で折りたたみが有効か無効かを指定します。fold 特性が同時に on になっていなければ折りたたみは発生しません。 |
| fold.comment | C++ の解析器を使っているときに複数行注釈を折りたたむことができるようになります。 |
| fold.at.else | C++ で "} else {" となっている行でも折りたたみを可能とします。 |
| fold.preprocessor | この特性は C++ 解析器 でプリプロセッサの折りたたみを可能とするためのものです。C# の厳密な #region と #endregion も含まれます。 |
|
fold.comment.python fold.quotes.python |
この特性は Python 解析器で複数行注釈や引用符で囲まれた文字列を折りたたみ可能とするためのものです。 |
| title.full.path | タイトルバーにファイル名がどのように表示されるかを選択します。省略値は 0 でファイル名のみが表示されます。1 に設定するとフルパスも表示されるようになります。2 の場合は "ファイル名 in ディレクトリ" の形で表示されます。 |
| title.show.buffers | 1 に設定すると現在の編集バッファ番号がタイトルバーに表示されます。 |
|
tabsize tab.size.filepattern indent.size indent.size.filepattern use.tabs use.tabs.filepattern indent.auto tab.indents backspace.unindents |
標準の書式定義における空白文字の大きさを単位としたタブの大きさを定めます。indent.size は自動字下げの実施に用いられ、これはタブの大きさと違えることができます。多くの人がタブの大きさを 8 にしながら字下げを 4 にしています。use.tabs は字下げを作ったときにそれを空白文字だけで作るか可能な限りタブ文字を使うかを定めます。 tabsize, indent.size, use.tabs は filepattern と合致すると、その設定により上書きされます。 例えば:
indent.size.*.pas=3indent.auto が設定されていると indent.size と use.tabs は開かれたファイルの内容によって定められます。 tab.indents を設定しておくと字下げの中で Tab キーを押したときに indent.size の数だけホワイトスペースによる字下げを行います。設定がなければタブ文字を挿入します。backspace.unindents を設定しておくと字下げ部分で BackSpace キーを押したときにホワイトスペースを indent.size で指定した数だけ字下げを戻します。設定がなければキャレットの前の文字が削除されます。 |
|
indent.automatic indent.opening indent.closing indent.maintain.filepattern |
自動的な字下げの外観を定めます。自動字下げは indent.automatic=1 で有効になります。複合構文開始直後の括弧を字下げする場合は indent.opening に 1 を設定します。閉じ括弧については indent.closing で設定します。以上のことから両方を 0 にすると次のように字下げをします。
if (c)また、両方を 1 にすると次のようになります。
if (c)indent.maintain.filepattern=1 の設定を利用することで、いくつかのファイルにおいて自動字下げの挙動を単純に前の行に合わせるだけにすることができます。これはファイル種別依存の他の設定を上書きします。 |
|
statement.indent.filepattern statement.end.filepattern statement.lookback.filepattern block.start.filepattern block.end.filepattern |
字下げ認識を行う基準などの設定です。これらに設定する値は、書式番号で始まり単語あるいは文字が続きます。設定値に「二つ目の空白」があれば単語が、そうでなければ文字が列挙されているものとみなします。statement.indent で列挙されたキーワードは複合構文の開始を示すことに用いられます。例えば
statement.indent.$(file.patterns.cpp)=5 if else while
上記の例は他の理由がない限り C++ の単語 "if", "else", "while" をキーワードの書式 5 で扱い、次の行を字下げする設定です。しかし、ステートメントが同じ行で終わっていればその行は字下げされません。C++ では、ステートメントが演算子書式ではセミコロンで終わります。そのことを定義するには次のように記述します。
statement.end.$(file.patterns.cpp)=10 ;
字下げ位置を決めるために遡って調べる行数は statement.lookback で定めます。この処理にかかる時間を制限したり、直前の行だけ見て字下げ位置を判断したりすることに利用できます。 block.start および block.end 特性は括弧でグループ化する言語要素を定義します。C++ では '{' と '}' になります。 |
| vc.home.key | Home および Shift+Home の挙動を選択します。省略値は 1 で Visual C++ のように字下げの終わりにキャレットを移動し、すでに移動済みであれば行頭に移動します。0 を設定していると単に行頭へ移動します。 |
|
warning.findwrapped warning.notfound warning.wrongfile warning.executeok warning.executeko warning.nootherbookmark |
これらの設定により Windows で SciTE を使用中に何か起きたとき、音を鳴らしたりウィンドウを点滅させたりすることができます。三つの要素を ',' で区切り、順に点滅の持続時間、音程、音の持続時間を表します。音程は数字で表されます(訳注:おそらく Hz 単位)。持続時間はミリ秒単位です。二番目の引数が数字でなければ音声ファイルへのパスとして扱われます。点滅を必要としない場合は一つ目の引数を 0 にしてください。
warning.wrongfile=0,C:\Windows\Media\SFX\Glass.wav
例えば上記の例ではファイルを開く際に名前が正しくないときにガラス(訳注:の割れる)の音がするでしょう。 検索処理の実行中にファイルの端に達すると warning.findwrapped の設定が使用されます。検索もしくは条件分岐プリプロセッサに基づく移動の際に対象文字列が見つからないと warning.notfound の設定が使用されます。ビルドなどが成功したときは warning.executeok 、失敗したときは warning.executeko の設定が使用されます。ブックマークが見つからないときは warning.nootherbookmark の設定が使用されます。 |
|
fileselector.width fileselector.height |
GTK+ 専用です。Windows では意味を持ちません。ファイル選択ダイアログの初めの大きさを定めます。 |
| translation.missing | translation.missing の設定値は、各地域化版を使っていて locale.properties に対応する翻訳がない場合に使われます。これを "***" といった目印にしておくとどの単語が未訳になっているかを簡単に調べることができます。(訳注:新しい版で新しいメニューが追加された場合のためのものらしい) |
| menu.language | 「文書の種類」メニューでの項目および対応する拡張子を定めます。各メニュー項目は文書種名・拡張子・対応するキーボード操作の三つの要素を持ちます。対応するキーボード操作は利用するものだけに記述します。各要素は '|' で区切られます。次のような形で指定します。 H&ypertext|html|F12| メニュー項目は名前の前に '#' をつけることで無効化ができます。 |
| menukey.* | menukey.* によりメニューのキーボードショートカットを再定義できます。書式は次のようになります。
menukey.menu_title.menu_name=<補助キー名>key
例えばファイルメニューの終了に対するショートカットは次のようになります。
menukey.file.exit=<control>Q
注意しなくてはならない点はメニューの文字や名前に含まれる空白で、これは下線文字に変えて置かなくてはなりません。また、点々が後続している項目の場合はそれを除いておく必要があります。ファイルメニューの Save As... は "menukey.file.save_as" で参照されます。(訳注:訳者によるメニューの日本語訳側には途中で空白を挟む例がない) 複数の補助キーを一度に定義することができます。この場合は各キー名を < と > で囲んでおく必要があります。user.shortcuts と同じ補助キーが使用できます。同様に名前によるキー指定も user.shortcuts と同じものを使います。これに加えてキーボードショートカットを割り当てない "none" が利用可能です。 |
| source.default.extensions | コマンドラインで与えられた名前がファイルとしてもディレクトリとしても見つからなかった場合(ワイルドカードによるものも含む)、source.default.extensions の設定値がファイルを特定するための省略された拡張子として使用されます。例えば次のように指定します。 .cxx|.cpp|.c|.hxx|.hpp|.h|.bat|.txt|.lua 上記の例では win32\SciTEWin という指定で win32\SciTEWin.cxx を win32\SciTEWin.h より優先して読み込みます。 もし設定値が Bar.cxx|.cxx といったものである場合、第一項の合致により ScTEWinBar.cxx があればそれを開きます。 |
|
ext.lua.startup.script ext.lua.auto.reload ext.lua.reset extension.filepattern |
ext.lua 特性は SciTE 上の Lua スクリプト拡張に対応するものです。 extension.filepatten 特性は一般的な SciTE 拡張インタフェイスの一部ですが現時点では Lua スクリプト拡張にのみ使用されます。 SciTE が起動する際に Lua に対する一般的な状態を準備するための Lua スクリプトファイル名を ext.lua.startup.script 特性に定めます。この特性には絶対パスを指定しなくてはなりませんが、$(SciteDefaultHome) や $(SciteUserHome) を利用することができます。一般的なイベントハンドラやコマンド関数、その他の関数及びオブジェクトをここで定義できます。 ext.lua.auto.reload 特性は SciTE で startup script や the active extension script を保存したときに何をするかを定義します。省略値は 0 で startup script は起動時か編集バッファを切り替えたとき(ext.lua.reset に依存)に適用され、extension script は編集バッファを切り替えたときのみに適用されます。1 を設定した場合、スクリプトが保存される毎に SciTE は全体的な再初期化を行います。ext.lua.auto.reload が有効であっても SciTE の外側からファイルの変更があったことは通知されません。これを行うためには次の ext.lua.reset を使います。 ext.lua.reset はデバッグを目的に用意されています。ext.lua.reset の省略値は 0 で startup script は SciTE の起動時に一度だけ調査されます。1 を設定すると、バッファを切り替えるたびに startup script property を調査し新しい startup script を再読込します。ext.lua.auto.reload に比べて異なる(大きな)副作用があります。auto.reload と reset の両方を設定することが意味を持つこともありますが、通常は ext.lua.auto.reload のみで充分です。ext.lua.reset 特性は将来の SciTE で廃止され、ext.lua.auto.reload=2 に置き換わる可能性があります。 ext.lua.startup.script のほかに extension.filepattern 特性で特定のファイル種別に対応した関数やイベントハンドラを追加することができます。この特性の設定値が .lua で終わり、勝つその名前のファイルがあれば Lua 拡張がスクリプトを評価しイベントハンドラやそのスクリプトで定義された命令をバッファがアクティブになっている間使用することができます。ext.lua.startup.scriptで定義された関数やオブジェクトも上書きされない限り併用できます。 この拡張子による特性は与えられたディレクトリに対しての挙動も定義できます。パスのないファイル名だけを拡張子の部分に使用すると SciTE は局所ディレクトリから始まる標準特性ファイル位置から該当ファイルを探します。局所特性ファイル SciTE.properties と組み合わせて用いると大変便利です。 |
|
position.left position.top position.width position.height |
Set the initial window size and position. If these are omitted then the environment's defaults are used. If the width or height are -1 then the window is maximised. |
| position.tile | If there is another copy of SciTE open, set the initial window position to be with the left side at position.left + position.width so that most of the time you can see both copies at once without overlap. Works nicely if position.left set to 0 and position.width set to half of the screen width. |
| buffers |
Set to a number between 1 and 100 to configure that many buffers.
Values outside this range are clamped to be within the range.
The default is 1 which turns off UI features concerned with buffers. This value is read only once, early in the startup process and only from the global properties files. So after changing it, restart SciTE to see the effect. |
|
are.you.sure are.you.sure.for.build |
The classic GUI question. Normally, when SciTE is about to close a file which has unsaved
edits it asks this annoying question. To turn off the question, set are.you.sure to 0 and
files will be automatically saved without bothering the user. To abandon edits to a file
use the New command. New always asks "Are you sure?" giving an opportunity to not save
the file. When running or building a file, its most likely that you want the file to be saved first. To enable a confirmation dialog for performing commands in the Tools menu, set are.you.sure.for.build=1. |
|
view.whitespace view.indentation.whitespace |
Setting view.whitespace to 1 makes SciTE start up with whitespace visible. Setting view.indentation.whitespace to 0 hides visible whitespace inside indentation. |
|
whitespace.fore whitespace.back |
Sets the colours used for displaying all visible whitespace, overriding any styling applied by the lexer. |
| view.indentation.guides highlight.indentation.guides |
Setting view.indentation.guides to 1 displays dotted vertical lines within indentation white
space every indent.size columns. Setting highlight.indentation.guides to 1 highlights the indentation guide associated with a brace when that brace is highlighted. |
| view.eol | Setting this to 1 makes SciTE display the characters that make up line ends. This looks similar to (CR), (LF), or (CR)(LF). This is useful when using files created on another operating system with software that is picky about line ends. |
| eol.mode |
The default EOL mode (characters that make up line ends)
depends on your platform.
You can overwrite this behaviour by setting the property to
  LF   for UNIX format
  CR   for Macintosh format
  CRLF for DOS/Windows format
As you see, Windows combines the best of the other worlds ;-) |
| eol.auto | This setting overrides the eol.mode value and chooses the end of line character sequence based on the current contents of the file when it is opened. The line ending used the most in the file is chosen. |
|
blank.margin.left blank.margin.right |
There is a blank margin on both sides of the text. It is drawn in the background colour of default text. This defaults to one pixel for both left and right sides but may be altered with these settings. |
| margin.width | Setting this to a number makes SciTE display a selection margin to the left of the text. The value is the number of pixels wide the selection margin should be. Line markers are displayed in the selection margin area. |
|
fold.margin.colour fold.margin.highlight.colour |
These two properties defined the fold margin colour and fold
margin highlight colour. If they are not defined (left commented out) the colours for the
fold margin will default to a reasonable pair of colours.
On Windows, the system colours are used to make the fold margin appear like the background
of scroll bars. As an example, with fold.margin.colour=#FF0000 and
fold.margin.highlight.colour=#0000FF, the fold margin is a mixture of red
and blue.
|
| full.screen.hides.menu | Setting this to 1 hides the menu bar when the Full Screen command is used on Windows. On GTK+ the menu is always visible. |
| minimize.to.tray | Setting this to 1 minimizes SciTE to the system tray rather than to the task bar. |
|
line.margin.visible line.margin.width |
SciTE is able to display a column of line numbers to the left of the selection
margin. Setting line.margin.visible to 1 makes this column visible at startup.
The line.margin.width property controls how much space is reserved for the line
numbers, in terms of the number of digits that can be displayed. To specify that
the margin should expand if needed to accomodate larger line numbers, add a '+'
after the number of digits, e.g. line.margin.width=3+.These properties replace the old line.numbers property, which
was overloaded to perform both of the actions described above. The
line.numbers property is no longer available.
|
|
tabbar.visible tabbar.hide.one |
Setting tabbar.visible to 1 makes the tab bar visible at start up on Windows. The buffers property must be set to a value greater than 1 for this option to work. Setting tabbar.hide.one to 1 hides the tab bar until there is more than one tab. Works on Windows and GTK+ 2.x but not GTK+ 1.x. |
| tabbar.multiline | Setting tabbar.multiline uses multiple lines for the tab bar |
| toolbar.visible | Setting this to 1 makes the tool bar visible at start up. |
| undo.redo.lazy | Setting this to 1 changes the technique used to determine when to enable or disable tool bar buttons to be less accurate. This may improve performance on slow machines. |
| statusbar.visible | Setting this to 1 makes the status bar visible at start up. |
|
statusbar.number statusbar.text.number |
The statusbar.text.1 option defines the information displayed in the status bar
by default on all platforms.
Property values may be used in this text using the $() syntax.
Commonly used properties are: ReadOnly, EOLMode, BufferLength,
NbOfLines (in buffer), SelLength (chars), SelHeight (lines).
Extra properties defined for the status bar are LineNumber, ColumnNumber, and
OverType which is either "OVR" or "INS" depending on the overtype status.
You can also use file properties, which, unlike those above, are not updated
on each keystroke: FileName or FileNameExt, FileDate and FileTime and
FileAttr. Plus CurrentDate and CurrentTime. On Windows only, further texts may be set as statusbar.text.2 .. and these may be cycled between by clicking the status bar. The statusbar.number option defines how many texts are to be cycled through. |
| use.palette | Setting this to 1 makes SciTE use a palette to enable it to display more colours on 8 bit displays. Without this option SciTE will only display with colours already available which is normally the 20 colour Windows system palette. The downside of turning on this option is that there will be some flashing as windows are activated. This option has no effect on GTK+ where a palette is always used. |
| buffered.draw | Setting this to 0 rather than the default 1 makes SciTE draw output directly to the screen rather than into a buffer bitmap first and then to the screen. Buffered drawing flickers less but is slower. |
| two.phase.draw | Two phase drawing is a better but slower way of drawing text. In single phase drawing each run of characters in one style is drawn along with its background. If a character overhangs the end of a run, such as in "V_" where the "V" is in a different style from the "_", then this can cause the right hand side of the "V" to be overdrawn by the background of the "_" which cuts it off. Two phase drawing fixes this by drawing all the backgrounds first and then drawing the text in transparent mode. Two phase drawing may flicker more than single phase unless buffered drawing is on. The default is for drawing to be two phase. |
|
load.on.activate save.on.deactivate |
The load.on.activate property causes SciTE to check whether the current file has been
updated by another process whenever it is activated. This is useful when another editor
such as a WYSIWYG HTML editor, is being used in conjunction with SciTE. The save.on.deactivate property causes SciTE to save the file whenever the SciTE application loses focus. This is useful when developing web pages and you want to often check the appearance of the page in a browser. |
| are.you.sure.on.reload | When both this and load.on.activate are set to 1, SciTE will ask if you really want to reload the modified file, giving you the chance to keep the file as it is. By default this property is disabled, causing SciTE to reload the file without bothering you. |
| reload.preserves.undo | When set to 1, reloading a file does not delete all the undo history. This is useful when load.on.activate is used in conjunction with filter commands. |
| check.if.already.open | When this option is set and SciTE is started, it checks to see if there are any other instances of SciTE open. If there is, another instance is activated and this one exits. An arbitrary instance is chosen and asked to open the command line argument. |
| read.only | When this option is set then opened documents are initially read only. New files are not affected by this setting. |
| quit.on.close.last | If this option is set, SciTE will close when its last buffer has been closed, e.g. with File/Close. (By default, if this option is not set, SciTE will remain open and will create a new blank document when its last buffer is closed.) |
|
selection.fore selection.back |
Sets the colours used for displaying selected text. If one of these is not set then that attribute is not changed for the selection. The default is to show the selection by changing the background to light grey and leaving the foreground the same as when it was not selected. |
| caret.fore | Sets the colour used for the caret. |
| caret.line.back | Sets the background colour used for line containing the caret. |
| caret.period | Sets the rate at which the caret blinks. The value is the time in milliseconds that the caret is visible before it is switched to invisible. It then stays invisible for the same period before appearing again. A value of 0 stops the caret from blinking. |
| caret.width | Sets the width of the caret in pixels. Only values of 1, 2, or 3 work. |
|
caret.policy.xslop caret.policy.width caret.policy.xstrict caret.policy.xeven caret.policy.xjumps caret.policy.yslop caret.policy.lines caret.policy.ystrict caret.policy.yeven caret.policy.yjumps |
If slop is set, we can define a slop value: width for xslop, lines for yslop. If strict is set, the policy is enforced... strictly. If jumps is set, the display is moved more energetically
so the caret can move in the same direction longer before the policy is applied again. If even is not set, instead of having symmetrical UZs,
the left and bottom UZs are extended up to right and top UZs respectively. See the table below to see how these settings interact. |
|
visible.policy.strict visible.policy.slop visible.policy.lines |
Determines how the display area is determined after a Go to command or equivalent such as a Find or Next Message. Options are similar to caret.policy.*. |
|
edge.mode edge.column edge.colour |
Indicates long lines. The default edge.mode, 0, does not indicate long lines. An edge.mode of 1 uses a vertical line to indicate the specified column and an edge.mode of 2 changes the background colour of characters beyond that column. For proportional fonts, an edge.mode of 2 is more useful than 1. |
| control.char.symbol | Sets the character to use to indicate control characters. If not set, control characters are shown as mnemonics. |
|
error.marker.fore error.marker.back |
The colours used to indicate error and warning lines in both the edit and output panes are set with these two values. If there is a margin on a pane then a symbol is displayed in the margin to indicate the error message for the output pane or the line causing the error message for the edit pane. The error.marker.back is used as the fill colour of the symbol and the error.marker.fore as the outline colour. If there is no margin then the background to the line is set to the error.marker.back colour. |
| error.select.line | When a command execution produces error messages, and you step with F4 key through the matching source lines, this option selects the line where the error occurs. Most useful if the error message contains the column of error too as the selection will start at the column of the error. The error message must contain the column and must be understood by SciTE (currently only supported for HTML Tidy). The tab size assumed by the external tool must match the tab size of your source file for correct column reporting. |
| openpath.filepattern | Defines a path for the Open Selected Filename command in the File
menu. The path is searched if the selected filename doesn't contain an
absolute path or the file is not found in the document directory. The
directories in openpath are separated by ';' on Windows and ':' on GTK+. An openpath setting may look like: openpath.*.txt=c:\dos\;f:\;
|
| open.suffix.filepattern | Defines a suffix to add to the selected file name for the
Open Selected Filename command in the File menu.
This is used in languages where the suffix is not given when accessing a file.
An example is python where "import xlib" will most often mean to import from
a file called "xlib.py". An open.suffix setting may look like: opensuffix.*.py=.py
|
| strip.trailing.spaces | Strips trailing white spaces from the file while saving. |
| ensure.final.line.end | Ensures file ends with a line end when saved. |
| ensure.consistent.line.ends | Ensures all lines end with the current Line End Characters setting when saved. |
| api.filepattern |
Loads a set of API files for a particular language.
If there is more than one API file then the file names are separated by ';'.
API files contain a sorted list of
identifiers and function prototypes, one per line. The "Complete Identifier" command
looks at the characters before the caret and displayed the subset of the API file
starting with that string. When an opening brace is typed, the file is searched for the
text preceding the caret and if a function prototype is found then it is displayed as a
calltip.
For example, the setting
api.*.c=w.apicould be used with a w.api file containing
fclose(FILE* fileClose)to provide autocompletion and calltips for some of the C file functions. It is best to use the full path to the API file as otherwise the current directory is used. See the Creating API files section for ways to create API files. |
| autocomplete.choose.single | When set to 1 and an autocompletion list is invoked and there is only one element in that list then that element is automatically chosen. This means that the matched element is inserted and the list is not displayed. |
|
autocomplete.lexer.ignorecase autocomplete.*.ignorecase |
When set to 1 the API file is searched in a case insensitive way to find elements for autocompletion lists. Otherwise matches only occur if case also matches. The * form is used if there is no lexer specific setting. |
|
calltip.lexer.parameters.start calltip.lexer.parameters.end calltip.lexer.parameters.separators calltip.*.parameters.start calltip.*.parameters.end calltip.*.parameters.separators |
Allows you to specify characters which start, end and separate parameters. For most common languages, it's usually left brace for start, right brace for end and comma or semicolon for separator. E.g. CSS has colon for start, space for separator and nothing for end. You can specify more characters for each property. The * form is used if there is no lexer specific setting. |
|
autocomplete.lexer.start.characters autocomplete.*.start.characters |
If this setting is not empty, typing any of the characters will cause autocompletion to start. For example, if autocomplete.python.start.characters=. and the API file for Python contains "string.rjust" and "string.replace" then typing "string." will cause the autocompletion to display both identifiers. The * form is used if there is no lexer specific setting. |
|
autocomplete.lexer.fillups autocomplete.*.fillups |
If this setting is not empty, typing any of the characters will cause autocompletion to complete. For example, if autocomplete.python.fillups=( and the API file for Python contains "string.replace" then typing "string.r(" will cause "string.replace(" to be inserted. The * form is used if there is no lexer specific setting. |
| autocompleteword.automatic | If this setting is 1 then when typing a word, if only one word in the document starts with that string then an autocompletion list is displayed with that word so it can be chosen by pressing Tab. |
|
calltip.lexer.ignorecase calltip.*.ignorecase |
When set to 1 the API file is searched in a case insensitive way to find the function which will have its signature displayed as a calltip. The * form is use if there is no lexer specific setting. |
|
calltip.lexer.word.characters calltip.*.word.characters |
To determine the identifier to look up for calltips, a search is performed allowing the characters in this set to be included in the identifier. While the same setting can be used as for word.characters, sometimes additional characters may be allowed. For example, in Python, '.' is not normally considered part of a word when selecting text, but it is good to allow "string.replace" to show a calltip so calltip.python.word.characters=._$(chars.alpha) would be a reasonable setting. The * form is used if there is no lexer specific setting. |
|
calltip.lexer.end.definition calltip.*.end.definition |
API files may contain explanatory text after each function definition. To display the explanation on a second line, set this property to the character used at the end of the definition part. For most languages, this is ')'. The * form is used if there is no lexer specific setting. |
| calltip.back | Sets the colour used for the background of any calltips. The default is white. |
| xml.auto.close.tags | For XML and HTML, setting this property to 1 will automatically insert the corresponding end tag when '>' is typed to end a start tag. Type "<td>" and the result will be "<td></td>" with the caret placed between the tags. |
| html.tags.case.sensitive | For XML and HTML, setting this property to 1 will make tags match in a case sensitive way which is the expected behaviour for XML and XHTML. |
| asp.default.language | Script in ASP code is initially assumed to be in JavaScript. To change this to VBScript set asp.default.language to 2. Python is 3. |
| sql.backslash.escapes | Enables backslash as an escape character in SQL. |
| styling.within.preprocessor | For C++ code, determines whether all preprocessor code is styled in the preprocessor style (0, the default) or only from the initial # to the end of the command word(1). |
| tab.timmy.whinge.level |
For Python code, checks whether indenting is consistent. The default, 0 turns off
indentation checking, 1 checks whether each line is potentially inconsistent with the
previous line, 2 checks whether any space characters occur before a tab character
in the indentation, 3 checks whether any spaces are in the indentation, and 4 checks
for any tab characters in the indentation. 1 is a good level to use. |
| user.shortcuts |
Define keys that perform commands.
This is a '|' delimited list of keys and the commands they produce.
The commands are either string or numeric IDs.
Numeric IDs above 2000 are Scintilla commands and are sent to the focussed pane.
Named IDs and numeric IDs below 2000 are SciTE menu commands which can be
found in from scite/src/SciTE.h.
The modifiers are Ctrl, Shift, and Alt and the named keys are Left,
Right, Up, Down, Insert, End, Home, Enter, Space, KeypadPlus, KeypadMinus,
Escape, Delete, PageUp, PageDown, Slash, Question, Equal.
user.shortcuts=\
|
|
magnification output.magnification |
Sets the initial magnification factor of the edit and output panes. This is useful when you want to change the size of text globally, such as after changing the screen resolution without having to touch every style setting. 0 is default, negative values makes the size smaller and positive values make it larger. |
|
split.vertical output.horizontal.size output.vertical.size |
If split.vertical is set to 1 then the output pane is to the right of the editing pane, if set to 0 then the output pane is below the editing pane. The output.*.size settings determine the initial size of the output pane. |
| clear.before.execute | If set to 1 then the output pane is cleared before any tool commands are run. |
|
horizontal.scrollbar horizontal.scroll.width output.horizontal.scrollbar output.horizontal.scroll.width output.scroll end.at.last.line |
If horizontal.scrollbar set to 0 then the edit pane's horizontal scrollbar is not displayed. horizontal.scroll.width is the document width assumed for scrolling. Similarly, output.horizontal.scrollbar and output.horizontal.scroll.width controls the horizontal scroll bar of the output pane. To stop the output pane from automatically scrolling, set output.scroll to 0. To have the output pane scroll and return back to the line of the executed command, set output.scroll to 1. If you want the output pane to scroll and remain at the bottom after execution, set output.scroll to 2. The vertical scroll range is normally set so that maximum scroll position has the last line at the bottom of the view. Set end.at.last.line to 0 to allow scrolling one page below the last line. |
|
wrap output.wrap |
If wrap set to 1 then the edit pane is dynamically line wrapped. If output.wrap set to 1 then the output pane is dynamically line wrapped. These options have a high performance cost which is proportional to the amount of text so should be turned off for large documents on slow machines. |
| wrap.visual.flags | Flags to display markers at end and begin of wrapped lines for visual identify them. Set to 0 to not display markers (default). Set to 1 to display markers at end of wrapped lines, to 2 to display markers at begin of wrapped lines and to 3 to display markers at begin and end. |
| wrap.visual.flags.location | Flags to set the location of the display markers (if enabled) near to text or near to border. Set to 0 to have begin and end markers near to border (default). Set to 1 to have end markers near text, to 2 to have begin markers near text and to 3 to have all markers near text. |
| wrap.visual.startindent | Sets the indention of continued wrapped lines to better visual identify the wrapping. Default is 0 (no indention). Note if wrap.visual.flags is 2 or 3 (begin marker displayed) the line is indented at least 1, even if wrap.visual.startindent is still 0. |
| wrap.aware.home.end.keys | This property changes the behavior of the home and end keys when dynamic line wrapping is turned on. When set to 0 (the default), the Home and End keys will move the caret to the very beginning / end of the 'logical' line, whether or not the line is wrapped over multiple lines in the display. When this property is set to 1, the caret moves to the end of the current 'display' line if you press End once, or to the very end of the 'logical' line if you press End again. Likewise, the Home key moves first to the beginning of the 'display' line, then on to the very beginning of the line. In a pane where dynamic line-wrapping is not enabled, this setting has no effect. |
|
cache.layout output.cache.layout |
A large proportion of the time spent in the editor is used to lay out text prior to drawing it. This information often stays static between repaints so can be cached with these settings. There are four levels of caching. 0 is no caching, 1 caches the line that the caret is on, 2 caches the visible page as well as the caret, and 3 caches the whole document. The more that is cached, the greater the amount of memory used, with 3 using large amounts of memory, 7 times the size of the text in the document. However, level 3 dramatically speeds up dynamic wrapping by around 25 times on large source files so is a very good option to use when wrapping is turned on and memory is plentiful. |
| open.filter |
This is a complex expression used for determining the file types that will be available in
the open file dialog. For each type of file, there is some explanatory text, a '|'
character, some file patterns, and another '|' character. In the distributed
SciTEGlobal.properties file, the line continuation character '\', is used to spread these
items out, one per line. These file types appear in the "Files of type:" pull down. The
first item is the default, so you may wish to change the first item to include the file
types you commonly open. On GTK+, this option only works for GTK+ 2.4 or later. |
| max.file.size | To avoid to load accidently huge files on slow media, or just to ensure SciTE is used only to edit human readable code, user can set the max.file.size property to specify a limit to file loading. If unset or set to 0, there is no limits. If set to a given byte size and if a file to load exceeds this limit, user is asked if the file has to be loaded. If accepted, the file is read as usual. If rejected, no action is taken (no file loaded, no buffer created). |
| save.deletes.first | Causes files to be deleted before being opened for saving. Can be used on Windows to ensure saving under a different capitalisation changes the files capitalisation rather than silently using the old capitalisation. |
|
save.recent save.session |
Setting save.recent causes the most recently used files list to be
saved on exit and
reloaded at start up. This list is kept in a file called "SciTE.recent" on
Windows and ".SciTE.recent" on GTK+ and is located in the directory
given by the SciTE_HOME environment variable and if that is not
set, the value of the HOME environment variable and if that is not
set the top level directory on GTK+ and the directory of the SciTE
executable on Windows. If you set "save.session=1", current session will be automatically saved to a file "SciTE.ses" on Windows and ".SciTE.ses" on GTK+ located at the same place as "SciTE.recent" file. When you start SciTE next time the last session will be automatically loaded. |
| open.dialog.in.file.directory | Setting open.dialog.in.file.directory causes the open dialog to initially display the same directory as the current file. If it is not set then the system default is used which on Windows 2000 is the last directory visited by the open dialog in any instance of SciTE. This is hard to use with multiple instances of SciTE. |
|
find.replace.matchcase find.replace.regexp find.replace.wrap find.replace.escapes find.replacewith.focus |
These properties define the initial conditions for find and replace commands.
The find.replace.matchcase property turns of the "Match case" option,
find.replace.regexp the "Regular expression" option,
find.replace.wrap the "Wrap around" option and
find.replace.escapes the "Transform backslash expressions" option. If the find.replacewith.focus property is set, the Replace With input box is focused in Replace dialog if Find What is non-empty. |
| find.replace.regexp.posix | Change behavior of Regular expression search. If set to 0 (the default), characters '(' and ')' must be escaped by '\' to behave as regexp meta characters. If set to 1, these characters are meta characters itself. |
|
find.command find.input |
The Find in Files command works in a similar way to the building commands executing a
command line tool with output redirected to the output pane. If the command produces
output understood by one of the error output passes, as does grep, then the F4 and
Shift+F4 keys can be used to move through all the matches. The $(find.what),
$(find.files), and $(find.directory) variables can be used for the values from the
Find in Files dialog. There are some scripts that implement this feature in Perl better than grep does itself here and here. This command line works with Cygwin on Windows, with modifications to suit the Cygwin installation directory:
find.command=cmd /c c:\cygwin\bin\find "$(find.directory)"
-name "$(find.files)" -print0 |
c:\cygwin\bin\xargs -0 fgrep -G -n "$(find.what)"
On Windows, the find string can be given to the find command through its standard input stream to avoid problems with quote interpretation. To do this, specify find.input to be the search string, $(find.what). |
| find.files |
This is the default set of files to search through using the Find in Files command.
The find.files property can contain a list of sets of files separated by '|' like
"*.cxx *.h|*.py *.pyw|*.html" which adds three entries to the history and
uses the first as the default value. The evaluation of this setting is a little unusual in that each entry in the value from the property files is appended to the end of the history if that entry is not already present. This means that opening files from different directories will result in any local setting of find.files being added to the list. |
| find.in.files.close.on.find | Set to 0 to prevent the Find in Files dialog from closing when "Find" pressed. |
| code.page |
To support a DBCS language such as Japanese, a code page can be set here. This ensures
that double byte characters are always treated as a unit so the caret is never located
between the two bytes of a double byte character. On Windows, settings that may work include
932 (Japanese Shift-JIS), 936 (Simplified Chinese GBK), 949 (Korean), and 950 (Traditional Chinese
Big5). This option can only be 0 or 65001 on GTK+ where SciTE only supports single byte character sets and Unicode. Setting code.page to 65001 starts Unicode mode and the document is treated as a sequence of characters expressed as UTF-8. Display is performed by converting to the platform's normal Unicode encoding first so characters from any language will be displayed. Correct glyphs will only be displayed if fonts are chosen that contain the appropriate glyphs. Tahoma is a good choice on Windows 2000. For GTK+, the locale should be set to a Unicode locale by setting the LC_CTYPE property. For an English machine this can be
LC_CTYPE=en_US.UTF-8
Fonts with an "iso10646" registry should be used in a font set. Font sets are a '|' separated list of partial font specifications where each partial font specification can be in the form of foundry-fontface-charsetregistry-encoding *OR* fontface-charsetregistry-encoding *OR* foundry-fontface *OR* fontface. An example is "misc-fixed-iso10646-1|*". |
| character.set | This setting allows changing the character set that is asked for when setting up fonts. To use Russian Cyrillic characters, set character.set to 204. Other values that may work include Chinese (GB2312=134 or BIG5=136), Korean (129), Greek (161), Eastern European (238), Baltic (186), Turkish (162), Hebrew (177), Arabic (178), Thai (222), or Japanese (128). All of these values may work on Windows, but on GTK+ Baltic, Turkish, Thai and Vietnamese will probably not work. Please send email if you use one of these settings and it works or doesn't or if you have information on how to support other languages. |
|
comment.block.lexer comment.block.at.line.start.lexer comment.stream.start.lexer comment.stream.end.lexer comment.box.start.lexer comment.box.middle.lexer comment.box.end.lexer |
These settings are for the comment commands in the Edit menu and are
defined separately for each lexer. Not all languages support
both stream and block comments. Block comments are comments that start with a particular string and continue until the end of line. The comment.block property sets the string to be inserted or deleted at the start of the selected lines when the Block Comment or Uncomment command is performed. To make this command perform sensibly over a range of text that already contains comments and other code, the string can be defined to contain a character such as '~' that is not used in real comments. Set comment.block.at.line.start to "1" to place block comment symbols at the start of the lines, instead of just before the first non-blank character of the lines. Stream comments start with a particular string and end with another particular string and may continue over line ends. These are defined with comment.stream.start and comment.stream.end. Box comments are a form of stream comment that takes several lines and uses different strings for the start, end and other lines in the range. These are defined with comment.box.start, comment.box.middle and comment.stream.end. |
|
preprocessor.symbol.filepattern preprocessor.start.filepattern preprocessor.middle.filepattern preprocessor.end.filepattern |
These settings make the preprocessor conditional movement and selection commands work. The character that defines preprocessor lines is defined by preprocessor.symbol. The preprocessor keywords that make up the start (if), middle (else), and end (endif) of preprocessor conditionals are defined by the other three properties. There may be multiple values for each of these, as, for example, C uses "if", "ifdef", and "ifndef" to begin preprocessor conditionals. |
| lexer.filepattern | A lexer splits a file up into syntactic pieces. SciTE can then display these pieces in different visual styles. Several lexers are available in SciTE for some of the popular programming languages such as Python, Java, C/C++, JavaScript and VB. Often several file extensions (.cpp, .cc, .h) can map to one language (C++) and hence one lexer. These settings associate a file name with a lexer. |
| lexerpath.filepattern | Specifies the path to an external lexer module that will be loaded into Scintilla. |
|
keywords.filepattern keywords2.filepattern keywords3.filepattern keywords4.filepattern keywords5.filepattern keywords6.filepattern keywords7.filepattern keywords8.filepattern keywords9.filepattern keywordclass.lexer |
Most of the lexers differentiate between names and keywords and use the keywords
variables to do so. To avoid repeating the keyword list for each file extension, where
several file extensions are used for one language, a keywordclass variable is defined in
the distributed properties file although this is just a convention. Some lexers define a
second set of keywords which will be displayed in a different style to the first set of
keywords. This is used in the HTML lexer to display JavaScript keywords in a different
style to HTML tags and attributes. Keywords can be prefix based so ^GTK_ will treat all words that start with GTK_ as keywords. |
| default.file.ext | Defines the language mode used before the file has a name. For example, if default.file.ext=.py, then when the New command is used to create a new file then Python syntax styling is used. |
| word.characters.filepattern | Defines which characters can be parts of words. The default value here is all the alphabetic and numeric characters and the underscore which is a reasonable value for languages such as C++. |
| whitespace.characters.filepattern | Defines which characters are considered whitespace. The default value is that initially set up by Scintilla, which is space and all chars less than 0x20. Setting this property allows you to force Scintilla to consider other characters as whitespace (e.g. punctuation) during such activities as cursor navigation (ctrl+left/right). |
|
style.*.stylenumber style.lexer.stylenumber |
The lexers determine a style number for each lexical type, such as keyword, comment or
number. These settings determine the visual style to be used for each style number of
each lexer. The value of each setting is a set of ',' separated fields, some of which have a subvalue after a ':'. The fields are font, size, fore, back, italics, notitalics, bold, notbold, eolfilled, noteolfilled, underlined, notunderlined, and case. The font field has a subvalue which is the name of the font, the fore and back have colour subvalues, the size field has a numeric size subvalue, the case field has a subvalue of 'm', 'u', or 'l' for mixed, upper or lower case, and the bold, italics and eolfilled fields have no subvalue. The value "fore:#FF0000,font:Courier,size:14" represents 14 point, red Courier text. A global style can be set up using style.*.stylenumber. Any style options set in the global style will be inherited by each lexer style unless overridden. On GTK+ 2, Pango anti-aliased fonts can be chosen by prefixing the font name with "!", such as "font:!Sans". |
|
style.lexer.32 style.lexer.33 style.lexer.34 style.lexer.35 style.lexer.36 style.lexer.37 |
As well as the styles generated by the lexer, there are other numbered styles used. Style 32 is the default style and its features will be inherited by all other styles unless overridden. Style 33 is used to display line numbers in the margin. Styles 34 and 35 are used to display matching and non-matching braces respectively. Style 36 is used for displaying control characters. This is not a full style as the foreground and background colours for control characters are determined by their lexical state rather than this style. Style 37 is used for displaying indentation guides. Only the fore and back are used. A * can be used instead of a lexer to indicate a global style setting. |
|
braces.check braces.sloppy style.lexer.34 style.lexer.35 braces.lexer.style |
Brace highlighting is a feature that shows the range of a brace when the caret is positioned immediately after it. It is especially useful when complex nested braces are used. The characters '(', ')', '[', ']', '{', and '}' are considered braces. The feature defaults to off (because it slows cursor movement) unless braces.check is set to 1. If braces.sloppy is set to 1 then if there is no brace before the caret then the character after the caret is checked. The highlighting is performed by displaying the braces in style number 34 or in style number 35 if there is no matching brace. While this is a full style, to avoid partial display of the braces, it is best to make this style differ from the standard style of braces only in foreground and background colour. Only braces with style set to braces.lexer.style (which defaults to 0) are candidates for brace match highlighting. |
| font.monospace | Defines, with the same syntax as the style properties, the font name and size to be used when the Use Monospaced font command is performed. |
|
command.compile.filepattern command.compile.subsystem.filepattern command.build.filepattern command.build.subsystem.filepattern command.build.directory.filepattern command.go.filepattern command.go.subsystem.filepattern |
These settings choose which commands to execute when the Compile, Build or Go menu items
are selected. The subsystem options determine for Windows whether the tools are run as
command line(0), windowed(1), through ShellExecute(2), or through the director interface(3). When source files are in a different directory to that they should be built in, the command.build.directory property can be set to change to a particular directory before performing the build. |
|
command.go.needs.filepattern command.go.needs.subsystem.filepattern |
Sometimes a file must be compiled or built before it can be run. If this is the case,
this setting indicates what command needs to be run to perform the compile or build step
before running the file. When a file is compiled, this is noted and future runs will not
perform a compile or build. To make a 'compile and go' Go command for .c files:
command.go.*.c=$(FileName)
|
|
command.name.number.filepattern command.number.filepattern command.is.filter.number.filepattern command.subsystem.number.filepattern command.save.before.number.filepattern command.input.number.filepattern command.replace.selection.number.filepattern command.quiet.number.filepattern command.mode.number.filepattern command.shortcut.number.filepattern |
Extra commands can be added to the Tools menu. For example to include the 'astyle'
indenter, the properties file could contain
command.name.0.*.cc=IndentThe first line defines the string that will appear in the Tools menu (immediately below 'Go'. The second line is the command string, similar to those of the compile, build, and go commands. The optional command.is.filter property states that the command modifies the current file so it may need to be read in after performing the command if load.on.activate is set. The subsystem determines how the command is executed on Windows. 0, the default is for command line programs, 1 for programs which create their own windows, 2 for running by using ShellExecute, 3 for running in an internal extension or director extension, 4 for running HtmlHelp on Windows, and 5 for running WinHelp on Windows. When using subsystem 4 or 5, the command has two parts separated by ! with the first part being the topic to search for and the second the name of the help file. If command.save.before is set to 1, SciTE automatically saves the file before execution. If it is set to 2, SciTE will not save the file, otherwise SciTE asks you. On Windows, the optional command.input property specifies text that will be piped to the command. This may reference other properties; for example, command.input.0.*.cc=$(CurrentSelection)
would pipe the current selection to the command processes.
The command.input property is only supported for subsystem 0
(command line programs).On Windows, the optional command.replace.selection can be used to specify that the command output should replace the current selection (or be inserted at the cursor location, if there is no selection). This property has three available settings: 0, the default, means do not replace the selection. 1 means replace the selection when the command finishes. 2 means replace the selection only if the command finishes with an exit code of 0. If the user cancels the command via "Tools / Stop Executing", the selection will not be replaced even in mode 1. Note, commands run asynchronously, so you are not prevented from modifying the document or even switching buffers while a command is running. However, please bear in mind that command.replace.selection will send the output to whatever window is active when the command completes. A final command property that is currently supported only on windows is command.quiet. A value of 1 indicates that the command I/O should not be echoed to the output pane. This may be useful in combination with command.input and command.replace.selection. The command.mode property is a comma-separated list of flags / settings. Each mode setting can have an argument, separated from the setting name by a colon. For most of these, the argument portion is optional; if the setting name appears without an argument, this works the same as "setting:yes". If a setting is included in the command.mode but also appears as a separate command property, the mode property will be overridden. Similarly, if a single setting appears more than once with different arguments, the last valid argument takes priority. The supported command.mode settings are: filter - accepts keyword arguments yes and no quiet - accepts keyword arguments yes and no replaceselection - accepts yes, no, and auto savebefore - accepts yes, no, and prompt subsystem - console, windows, shellexec, lua, director, winhelp, htmlhelp groupundo - yes or noCurrently, all of these except groupundo are based on individual properties with similar names, and so are not described separately here. The groupundo setting works with subsystem 3 (lua / director), and indicates that SciTE should treat any changes made by the command as a single undo action. A command that uses the groupundo setting should not change which buffer is active in the editor. The command.shortcut property allows you to specify a keyboard shortcut for the command. By default, commands 0 to 9 have keyboard shortcuts Ctrl+0 to Ctrl+9 respectively, but this can be overridden. For commands numbered higher than 9, there is no default keyboard shortcut. The notation used to specify keyboard shortcuts is the same as for the user.shortcuts property, described elsewhere in this document. If the text of a command starts with '*' then the Parameters dialog is displayed to prompt for parameters before executing the command. The initial '*' is not included in the command that is executed. |
|
command.help.filepattern command.help.subsystem.filepattern |
Defines a command to be executed when the help command is invoked or F1 pressed. On Windows, this often uses subsystem 4 as described above. On Linux, running man or a browser are common ways of displaying help. The word at the cursor is copied to $(CurrentWord) and this is often a good argument to the help application. The subsystem property works in the same way as for other commands. |
|
command.scite.help command.scite.help.subsystem |
Defines a command to be executed for help on the SciTE program itself which normally means displaying this file in a browser. |
|
command.print.filepattern command.print.subsystem.filepattern |
Defines a command to be executed when print is invoked on GTK+. |
| win95.death.delay | On Windows 95, there can be a delay between a process completing and all of its piped output being available. By waiting this number of milliseconds, we can be sure to see all the output. Defaults to 500 but may need to be higher for slower machines. |
| time.commands | When a command is completed, print the time it took in seconds. |
| print.magnification | Printing is normally done with the same settings as screen display. To make the printing larger or smaller, the print.magnification setting is added to the size of every font when printed. To get a good miniaturisation of text, set print.magnification to -4. |
| print.colour.mode | Some people prefer light coloured text on a black background on screen but dark text on white on paper. If print.colour.mode is set to 1 then each colour is inverted for printing. If set to 2 then printing produces black text on white background. 3 forces the background to white and 4 forces the default background to white. |
| print.margins | Specify the default margins on the printer on Windows in left right top bottom order. Units depends on your locale, either hundredths of millimetres or thousandths of inches. You can see which units by the units used in the page setup dialog. This property is only read at start up. |
|
print.header.format print.footer.format |
These settings determine what will be printed if anything as headers and
footers. Property settings can be substituted into the values using the $(property)
syntax. There are some extra properties set up while printing:
CurrentPage, FileTime, FileDate, CurrentDate, and CurrentTime (at start of
printing).
Common properties to use in headers and footers are FileNameExt and FilePath. A header setting may look like:
print.header.format=$(FileNameExt) - Printed on $(CurrentDate),$(CurrentTime) - Page $(CurrentPage)
|
|
print.header.style print.footer.style |
These settings determine the style of the header and footer using the same format as other styles in SciTE. Only the fore, back, font, size, bold, italics, and underlined attributes are supported. |
| export.keep.ext | This property determines how the file name (for example, LineMarker.cxx) is transformed when exporting to include the appropriate export format extension - .html for HTML and .rtf for RTF. If export.keep.ext is the default, 0, then the current extension is replaced (LineMarker.html). If it is 1, then the export format extension is added (LineMarker.cxx.html). If it is 2 then the final '.' is replaced by '_' and the export format extension added (LineMarker_cxx.html). |
|
export.html.wysiwyg export.html.tabs export.html.folding export.html.styleused export.html.title.fullpath |
When export.html.wysiwyg is set to 0 then exporting to a HTML file produces a smaller
file but which is less completely specified so may look more different to the on screen display.
When export.html.tabs is set to 1 and export.html.wysiwyg is set to 0 then tab characters in
the file are exported as tab characters rather than a sequence of space characters. The exported file can be made to fold in browsers that support CSS well (Mozilla and Internet Explorer) by setting export.html.folding to 1. Only export styles actually used when export.html.styleused set to 1. The full path name of the file is put in the title, instead of just the file name when export.html.title.fullpath set to 1. |
|
export.rtf.wysiwyg export.rtf.tabs export.rtf.font.face export.rtf.font.size export.rtf.tabsize |
When export.rtf.wysiwyg is set to 0 then exporting to a RTF file produces a smaller
file but which is less completely specified so may look more different to the on screen display.
When export.rtf.tabs is set to 1 and export.rtf.wysiwyg is set to 0 then tab characters in
the file are exported as tab characters rather than a sequence of space characters. export.rtf.font.face and export.rtf.font.size can be used to select a particular font and size for the exported RTF file. export.rtf.tabsize can be set to use a different tab size than that defined by the tabsize setting. |
|
export.pdf.magnification export.pdf.font export.pdf.pagesize export.pdf.margins |
export.pdf.magnification is a value that is added to the font size of the default screen style in use.
A positive value increases the PDF document's font size, and vice versa. export.pdf.font accepts a one-word parameter that selects one of the default PDF fonts: Courier, Helvetica or Times. Helvetica is the default. Helvetica and Times do not line wrap, Courier line wraps. export.pdf.pagesize is used to set the document's page size, using points (1/72th of an inch) as the unit. E.g. Letter paper (8.5 inch x 11 inch) is specified using the values 612,792. export.pdf.margins sets the widths of the page margins. Margins defaults to 72 points, or 1 inch. The PDF exporter is necessarily feature-limited because PDF is a document archival format. Supporting a full set of features will bloat SciTE. Wrapping Helvetica or Times adequately isn't possible without the complexities of font metrics and kerning. The PDF produced uses WinAnsiEncoding, so pre-encoding has to be done before exporting to PDF, if you want to use extended characters. |
|
export.xml.collapse.spaces export.xml.collapse.lines |
export.xml.collapse.spaces and export.xml.collapse.lines are flags that control how empty lines and runs of space characters are converted into XML. The flags are enabled if set to 1. Tab characters are always converted by the XML exporter into spaces according to the tabsize property. |
|
fold fold.margin.width fold.symbols fold.on.open |
Options to control folding. Folding is turned on be setting fold to 1. The fold.symbols setting chooses between four ways of showing folding. Set to 0 (the default) for MacOS style arrows to indicate contracted (facing right) and expanded (facing down); 1 to display contracted folds with "+" and expanded with "-"; 2 for a flattened tree control with round headers and rounded joins; 3 for a flattened tree control with square headers. To automatically fold files as much as possible when loaded, set fold.on.open to 1. |
| fold.flags | Not really documented ;) bit flags which may go away. 2, 4, 8, and 16 control drawing lines above and below folding lines if expanded or not expanded. Set to 64 to help debug folding by showing hexadecimal fold levels in margin. |
|
fold.compact |
For HTML, XML, Lua and C++ and similar files, turning this option on leads to blank lines following the end of an element folding with that element. Defaults to on. |
| fold.html | Folding is turned on or off for HTML and XML files with this option. The fold option must also be on for folding to occur. |
| fold.comment | This option enables folding multi-line comments when using the C++ lexer. |
| fold.at.else | This option enables C++ folding on a "} else {" line of an if statement. |
| fold.preprocessor | This option enables folding preprocessor directives when using the C++ lexer. Includes C#'s explicit #region and #endregion folding directives. |
|
fold.comment.python fold.quotes.python |
These options enable folding multi-line comments or quoted strings when using the Python lexer. |
| title.full.path | Chooses how the file name is displayed in the title bar. When 0 (default) the file name is displayed. When 1 the full path is displayed. When 2 the window title displays "filename in directory". |
| title.show.buffers | When set to 1 shows the current buffer number in the title bar. |
|
tabsize tab.size.filepattern indent.size indent.size.filepattern use.tabs use.tabs.filepattern indent.auto tab.indents backspace.unindents |
Sets the size of a tab as a multiple of the size of a space character in the style of the
default style definition. The indent size is the size to use when performing automatic
indentation and may be different from the tab size. Many people use a tab size of 8 but
4 character indentation. When creating indentation, use.tabs determines whether the
indentation is made up purely from space characters or from a mix of tabs and spaces
using as many tabs as possible. The global tabsize, indent.size, and use.tabs properties can be overridden for files that match a pattern by using the using the file pattern forms:
indent.size.*.pas=3If indent.auto is set then indent.size and use.tabs are set according to the contents of the opened document. If tab.indents is set then pressing tab within indentation whitespace indents by indent.size rather than inserting a tab character. If backspace.unindents then pressing backspace within indentation whitespace unindents by indent.size rather than deleting the character before the caret. |
|
indent.automatic indent.opening indent.closing indent.maintain.filepattern |
Determines the look of automatic indentation. Automatic indentation is turned on with
indent.automatic=1. To indent a brace line after a compound statement start set
indent.opening=1, likewise for the terminating brace. So with both set to 0:
if (c)And with both set to 1:
if (c)Automatic indentation may be changed to simply repeat the indentation of the previous line for some files with indent.maintain.filepattern=1 which overrides the other language specific specific settings. |
|
statement.indent.filepattern statement.end.filepattern statement.lookback.filepattern block.start.filepattern block.end.filepattern |
Each of these settings starts with a style number and then a set of words or characters
that define how to recognise that feature. It there is second space in the setting then
it is a set of words, otherwise a set of characters. The set of keywords used to indicate
the start of a compound statement is defined in statement.indent. For example:
statement.indent.$(file.patterns.cpp)=5 if else while
says that for C++ the words "if", "else", and "while" in keyword style, 5, start compound statements which leads to the next line being indented if no other factors affect it. However, if a statement end is found on the same line then the next line is not indented. For C++ the statement end is the semicolon in the operator style, so this is defined:
statement.end.$(file.patterns.cpp)=10 ;
The number of lines looked at to determine indentation can be set with statement.lookback. This can be used either to bound the amount of time spent on this task or to specify that only the last line be examined for indentation. The block.start and block.end properties define the language elements used to bracket groups of statements. In C++ these are '{' and '}'. |
| vc.home.key | Chooses the behaviour of the Home and Shift+Home keys. 1, the default is like Visual C++ moving the caret to the end of the line indentation unless already there, in which case it moves to the start of the line. 0 moves to the start of the line. |
|
warning.findwrapped warning.notfound warning.wrongfile warning.executeok warning.executeko warning.nootherbookmark |
Allows for sounds to be played and the window to be flashed
on Windows when particular events occur.
The values consist of three items separated by ',': flash duration, sound
and sound duration. If sound is a number then it is treated as a pitch and
played for the duration in milliseconds.
Otherwise it is treated as a path to a sound file
that is played. If you do not want a flash, specify 0 for flash duration.
For example,
warning.wrongfile=0,C:\Windows\Media\SFX\Glass.wav
will play the glass sound if open selected is given a bad file name. The findwrapped warning occurs when a find operation wraps past either end of the file, notfound when the find or preprocessor conditional move commands fail to find a match, executeok when a command such as build executes successfully, executeko when a command fails, and nootherbookmark when there is no bookmark to find. |
|
fileselector.width fileselector.height |
For the GTK+ version determines the initial size of the file selector dialog invoked by the Open and Save commands. Setting has no effect on Windows. |
| translation.missing | When using a localised version, if a term is not found in the locale.properties translation file then use the value of translation.missing instead. By setting this to a marker such as "***" it is easier to check where terms have not been provided with translations. |
| menu.language |
Defines the entries in the Language menu and the file extensions they map to.
Each menu item is defined by 3 elements, language name, extension and an optional
keyboard equivalent. Each element is terminated by '|'. For example: H&ypertext|html|F12| Menu items may be commented out by prefixing the name with '#'. |
| menukey.* |
The menukey.* settings allow the user to redefine accelerator keys for menus
without having to resort to modifying the SciTE source code. The syntax for the setting is:
menukey.menu_title.menu_name=<modifier>key
For example, the File | Exit command accelerator could be specifed as follows:
menukey.file.exit=<control>Q
Note that spaces in menu titles and names must be converted to underscores, and trailing ellipses removed. For example, "File | Save As...." is referenced as "menukey.file.save_as". Multiple modifiers may be specified, though each must be surrounded by angle brackets. The recognized modifiers are the same as for the user.shortcuts setting described above. The recognized named keys are also the same as for user.shortcuts, with the addition of "none" to indicate that no accelerator key should be defined for a particular menu. |
| source.default.extensions |
If the name specified on the command line cannot be found as a directory or file - including a wild-card
search, the contents of the property are treated as default extensions to be used to locate the file name. An example is: .cxx|.cpp|.c|.hxx|.hpp|.h|.bat|.txt|.lua Attempting to open win32\SciTEWin would open win32\SciTEWin.cxx since it matches before win32\SciTEWin.h If the property contains an entry such as Bar.cxx|.cxx and you attempt to open win32\SciTEWin, it will open ScTEWinBar.cxx since that is the first match. |
|
ext.lua.startup.script ext.lua.auto.reload ext.lua.reset extension.filepattern |
The ext.lua properties are specific to the
SciTE Lua Scripting Extension. The extension.filepatten property
is part of the generic SciTE Extension
Interface but is currently only used by the Lua Scripting Extension.
The ext.lua.startup.script property defines the filename of a Lua script that will be loaded when SciTE starts to set up the global state for Lua. You should use an absolute path for this property, but can reference the $(SciteDefaultHome) or $(SciteUserHome) properties. Global event handlers, command functions, as well as other functions and objects can be defined here. The ext.lua.auto.reload property determines what happens if you save the startup script, or the active extension script, from within SciTE. If it is set to 0 (the default), the startup script only applied at startup time or when you switch buffers (depending on ext.lua.reset), and changes to the extension script are only applied when you switch buffers. If ext.lua.auto.reload is set to 1, SciTE will re-initialize the global scope immediately when either script is saved from within SciTE. Even when ext.lua.auto.reload is enabled, SciTE will not notice if the files are changed from outside the current SciTE instance. For that, see ext.lua.reset below. The ext.lua.reset property is primarily for debugging. If ext.lua.reset is 0 (the default), the startup script property is checked only once - when SciTE starts. If ext.lua.reset is changed to 1, SciTE will check the startup script property, and reload the new startup script, each time you switch buffers. As such, it has a different (larger) set of side effects than ext.lua.auto.reload. In some situations it will make sense for both auto.reload and reset to be enabled, but usually ext.lua.auto.reload alone will suffice. The ext.lua.reset property may go away in an upcoming version if SciTE, perhaps to be replaced with a new setting for ext.lua.auto.reload=2. Aside from ext.lua.startup.script, the extension.filepattern property provides a way to load additional functions and event handlers that may be specific to a given file type. If the extension property value ends in .lua and names a file that exists, the Lua extension evaluates the script so that event handlers and commands defined in the script are available while that buffer is active. Functions and objects defined through ext.lua.startup.script are still accessible, unless they are overridden. The extension property can also define behavior that is specific to a given directory. If a bare filename (no path) is specified in the extension property, SciTE looks for the file in the standard property file locations, starting with the local directory. This can be very useful in combination with a local SciTE.properties file. |
caret.policy.{x|y}<param> の挙動:
caret.policy.{x|y}<param> interaction:
| slop | strict | jumps | even | キャレットは余白に移動可能 | 不可視部または位置溢れ区間に移動した時の可視部の変化 |
|---|---|---|---|---|---|
| 0 | 0 | 0 | 0 | ○ | 上端・右端にキャレットを表示できるように移動 |
| 0 | 0 | 0 | 1 | ○ | 一単位だけ移動 |
| 0 | 0 | 1 | 0 | ○ | 上端・右端にキャレットを表示できるように移動 |
| 0 | 0 | 1 | 1 | ○ | キャレットを中心に移動 |
| 0 | 1 | - | 0 | キャレットは常に可視部の上端・右端にある | - |
| 0 | 1 | - | 1 | キャレットは常に中央にある | - |
| 1 | 0 | 0 | 0 | ○ | 非対称の位置溢れ区間から出るように可視部を移動 |
| 1 | 0 | 0 | 1 | ○ | キャレットが位置溢れを起こさないように可視部を移動 |
| 1 | 0 | 1 | 0 | ○ | 位置溢れ区間の三倍分可視部を移動 |
| 1 | 0 | 1 | 1 | ○ | 位置溢れ区間の三倍分可視部を移動 |
| 1 | 1 | - | 0 | キャレットは上端・右端から位置溢れ区間分内側に必ず表示 | - |
| 1 | 1 | 0 | 1 | 位置溢れ区間の内側に必ず移動 | 一単位だけ移動 |
| 1 | 1 | 1 | 0 | 位置溢れ区間の内側に必ず移動 | 位置溢れ区間の三倍分可視部を移動 |
| slop | strict | jumps | even | Caret can go to the margin | When reaching limit (going out of visibility or going into the UZ) display is... |
|---|---|---|---|---|---|
| 0 | 0 | 0 | 0 | Yes | moved to put caret on top/on right |
| 0 | 0 | 0 | 1 | Yes | moved by one position |
| 0 | 0 | 1 | 0 | Yes | moved to put caret on top/on right |
| 0 | 0 | 1 | 1 | Yes | centred on the caret |
| 0 | 1 | - | 0 | Caret is always on top/on right of display | - |
| 0 | 1 | - | 1 | No, caret is always centred | - |
| 1 | 0 | 0 | 0 | Yes | moved to put caret out of the asymmetrical UZ |
| 1 | 0 | 0 | 1 | Yes | moved to put caret out of the UZ |
| 1 | 0 | 1 | 0 | Yes | moved to put caret at 3UZ of the top or right margin |
| 1 | 0 | 1 | 1 | Yes | moved to put caret at 3UZ of the margin |
| 1 | 1 | - | 0 | Caret is always at UZ of top/right margin | - |
| 1 | 1 | 0 | 1 | No, kept out of UZ | moved by one position |
| 1 | 1 | 1 | 0 | No, kept out of UZ | moved to put caret at 3UZ of the margin |
キーワードが違うだけであるなど、すでに利用可能なものと非常に似ている文書は既存の解析器を利用できることがよくあります。既存のキーワードを新しい文書種用のキーワードで置き換えてください。Java と JavaScript は C++ 解析器を応用すると合理的に実装できました。Java は doc 注釈を加えるだけで成立していました。
For languages very similar to existing supported languages, which may only differ in a minor feature such as the keywords used, the existing lexers can often be reused. The set of keywords can then be changed to suit the new language. Java and JavaScript could have reasonably reused the C++ lexer. The Java lexer was added only to support doc comments.
既存の解析器では処理できない文書種は C++ で解析器を書き起こすことができます。Scintilla の中に実装するほか、外部モジュールとして SciTE 起動時に読み込ませることができます。lexerpath を参照してください。→SciTE に解析器を実装させる / 外部解析器を作り、実装する
For languages that can not be lexed with the existing lexers, a new lexer can be coded in C++. These can either be built into Scintilla, or put into an external module and loaded when SciTE runs (See lexerpath).
Installing a lexer into SciTE新しい文書種の使えるようにするためには open.filter を編集して拡張子を選択できるようにしなくてはなりません。同様に、command.compile, command.build, command.go, command.go.needs の項目を追加すべきです。
The open.filter should be modified to include the file extensions used for the new language and entries added for command.compile, command.build, command.go and command.go.needs for the language.
The .api files can be generated by hand or by using a program.
C++ のヘッダに対しては、複数行に渡る関数プロトタイプをも完全に把握するするために ctags (訳注:日本語対応版なるものがあるらしい)をまず用い、続いて C/C++ を仮定した tags2api Python スクリプトをタグファイルに適用します。いくつかの共通ヘッダは引数一覧を __P マクロで囲んであり、注釈を含んでいます。cleanapi はこういったファイルに使用できます。
For C/C++ headers, an API file can be generated using ctags and then the tags2api Python script (which assumes C/C++ source) on the tags file to grab complete multiple line function prototypes. Some common headers surround parameter lists with a __P macro and may have comments. The cleanapi utility may be used on these files.
gen_python スクリプトで Python モジュール用 API ファイルを作ることができます。
To generate an API file for Python modules, there is a gen_python script.
ApiBuilder.javaで Java クラス用 API ファイルを作ることができます。
To generate an API file for Java classes, there is a ApiBuilder.java program.
SciTE は他の言語に翻訳したものを利用できます。
SciTE can be and has been translated into other languages.
SciTE のビルドとインストールの方法については SciTE の README ファイルに記述しています。
The procedure for building and installing SciTE is described in the README file in the scite directory.
Scintilla's Internal Design (Scintilla コンポーネントデザイン)
SciTE Versions (SciTE - Scintilla の実装)
Description of this Japanese Scite-doc translation
SciTE を拡張する通常のインタフェースは二つあります。ひとつは SciTE 拡張インタフェースで、SciTE の実行可能ファイルに一緒にコンパイルされます。他方は SciTE Director インタフェースで、Windows において他のアプリケーションから SciTE を操作するために使います。
There are two formal extension interfaces for SciTE, the SciTE Extension Interface is for extending SciTE with code compiled into the SciTE executable and the SciTE Director Interface is for manipulating SciTE on Windows from another application.